The command pslist will be useful for any forensic prelim inquiry to find out the processes being run on the pc at the likely time of incident.The pslist command is used to list the processes of a system and it does not detect hidden or unlinked processes."pslist" module utilizes the same algorithm as the tasklist command that would be executed on the live computer. And also, Windows Task Manager uses the same approach as well.The command "pslist" traverses the list of active process structures that the Windows kernel maintains.The screen shot below shows a task manager activity of a windows PC i am using for test.Subsequently I have taken a fresh dump at this time and then analysed this dump with volatility on UBUNTU to find the process details which actually come out as the same as seen in the screenshots below :
Windows TASK MANAGER as seen in Windows OS
(CLICK TO ENLARGE)
The command usage at terminal syntax goes like this :
The columns display the offset, process name, process ID, the parent process ID, number of threads, number of handles, and date/time when the process started. The offset is a virtual address by default, but the physical offset can be obtained with the -P switch as seen in the command below with screenshot.
pstree command is used to view the process listing in tree form and enumerates processes using the same technique as pslist, so it will also not show hidden or unlinked processes. Child process are indicated using indention and periods.SCreen shot of output and syntax as below :
psscan is used to enumerate processes by pool tag scanning and can find processes that previously terminated (inactive) and processes that have been hidden or unlinked by a rootkit. Syntax and screenshot of output as follows:
This command is used to scan for potential KDBG structures and is meant to positively identify the correct profile of the system and the correct KDBG (kernel debugger block) address. It simply scans for KDBG header signatures linked to the profiles in Volatility.
Screen shot executing the above command shown below :
(CLICK TO ENLARGE)
kpcrscan
This command is used to scan for potential KPCR(Kernel Processor Control Region) structures. A KPCR is a data structure used by the kernel to store the processor-specific data. Kpcrscan searches for and dumps potential KPCR values. On a multi-core system, each processor has its own KPCR. Therefore, ideally one should see at least as many KPCR addresses as there are processors on the machine from which the memory dump was acquired.Usage as follows :
1. After installing Volatility as I gave details in my post here,next we need to start exploiting the power of Volatility.In my next posts ahead I would decipher usage of the general commands used for Volatility.To start with I initiate with IMAGEINFO command whose output tells the suggested profile that you should pass as the parameter to --profile=PROFILE; there may be more than one profile suggestion if profiles are closely related. One can figure out which one is more appropriate by checking the "Image Type" field, which is blank for Service Pack 0 and filled in for other Service Packs.
2. Next few screen-shots show how I have taken the RAM dump of Windows 7 OS with the help of DUMPIT utility that I downloaded from here.Dumpit vastly simplifies memory acquisition. Effectively Dumpit combines win32dd and win64dd into one tool and is so simple to use even a non-technical user could do acquisition from a USB key. The dump can then be analyzed using VOLATILITY.
3. Firstly,I show u the windows screen here with the Dumpit file on desktop which I simply click one to get the dump.
I get the following screen and I click YES
Further yes to the command prompt screen starts the dump download as seen below :
I get a success message here and the dump is ready for analysis.
The .raw file that is generated,I move it to ubuntu for analysis which has Volatility installed.At the terminal I type the command as :
python vol.py -f file_name.raw imageinfo
and in a few minutes I get the profile suggested as Win7SP0x86 / Win7SP1x86
1. It had never happened in recent past and every time I used to mount the share folder for the guest OS in virtual box it used to happen vide this command :
sudo mount.vboxsf sharedfolder /mnt/foldername
where sharedfolder is the new folder you have created inside guest OS home directory in virtual box ~ ie /home to be mounted with another folder from host OS as foldername here
but today it showed an error with the following message :
/sbin/mount.vboxsf mounting failed with the error protocol error
as seen below :
tried everything around with the commands but didn't get resolved before I attempted to do the more simpler thing of going to the pwd of the folder where I created it to be mounted and typed the same command without path
1. The Volatility Framework is a completely open collection of tools, implemented in Python for the extraction of digital artifacts from volatile memory (RAM) samples. Volatility is a memory forensics framework, to analyse ram memory dumps for Windows, Linux, and Mac. In order to analyse a operating system’s RAM memory in Volatility, you need to build the corresponding operating system’s profile.The extraction techniques are performed completely independent of the system being investigated but offer unprecedented visibility into the runtime state of the system. The framework is intended to introduce people to the techniques and complexities associated with extracting digital artifacts from volatile memory samples and provide a platform for further work into this exciting area of research.Vide this post, I am sharing how to install volatility in Ubuntu 12.04 in a step wise manner.The post includes screen-shots and ready to shoot terminal commands for installing other dependent libraries.
1. Typically analyzing malware requires a great deal of knowledge in computers and expects basic knowledge of terminal commands,configuring the tool correct and right usage of advanced tools. As seen in my last post about Cuckoo usage and configuration,it is actually complex and confusing at times,now what if one can use Cuckoo without doing anything like that..no installation,no configuration,no testing and bugging...one can directly use Cuckoo directly for a sample file analysis.As we realize the power online tools,its becomes actually easier for anyone to analyze a file’s behavior by simply uploading the file to the free on-line services for automated analysis and review the detailed and yet easy to understand report.This way not only the analyst gets a quick report and analysis but more importantly he gets a variety of reports which can be compared and analyzed further leading to expedited pace of understanding and clarity of the malware architecture and working.Here I list out my choices of best on-line file/malware analyzers that can be used for free with address and screenshots of sample usage....
ThreatExpert is an advanced automated threat analysis system designed to analyze and report the behavior of computer viruses, worms, trojans, adware, spyware, and other security-related risks in a fully automated mode.In only a few minutes ThreatExpert can process a sample and generate a highly detailed threat report with the level of technical detail that matches or exceeds antivirus industry standards such as those normally found in online virus encyclopedias.
Wepawet is a free service, for non-commercial organizations, to detect and analyze web-based threats. It currently handles Flash, JavaScript, and PDF files.But the upload size of the file is limited to 2 Mb and below.
IObit Cloud is an advanced automated threat analysis system. It uses the latest Cloud Computing technology and Heuristic Analyzing mechanic to analyze the behavior of spyware, adware, trojans, keyloggers, bots, worms, hijackers and other security-related risks in a fully automated mode
Comodo Instant Malware Analysis is one of the easier to use and
understand online sandbox service wherein no submission form is required
nor an email address nor solving a CAPTCHA code. Simply browse the file that
you want to analyze in Comodo sandbox, tick the box to agree with their
terms and click the Upload file button. The file will then be analyzed
in real time and the report page will continuously refresh by itself
until the analysis has been completed.
Vicheck.ca is an advanced malware detection engine designed to decrypt and extract malicious executables from common document formats such as MS Office Word, Powerpoint, Excel, Access, or Adobe PDF documents. ViCheck will detect the majority of embedded executables in documents as well as common exploits which download malware from the internet.ViCheck is a free service designed to help the public detect new sophisticated malware which is often difficult to detect with common commercial anti-virus programs.
Anubis is another popular online service to analyze unknown Windows executable files. Four report formats (HTML, XML, PDF and Text) are available to download once the analysis has been complete.
GFI SandBox is meant for OEM or cloud providers and fortunately they’ve created a webpage that offers free analysis called ThreatTrack which uses their sandbox technology. ThreatTrack supports analyzing any Windows executable file, office documents, PDF files and even flash ads that is mostly not accepted by other online sandboxes.
Joe Sandbox is the automated malware analysis system which implements any state of the art program analysis technology from coarse to fine grained including dynamic, static and hybrid. Joe Sandbox’s analysis spectrum enables to discover any behavior including hidden or obfuscated parts.
Eureka is a binary static analysis preparation framework. It implements a novel binary unpacking strategy based on statistical bigram analysis and coarse-grained execution tracing. Eureka incorporates advanced API deobfuscation capabilities to facilitate the structural analysis of the underlying malware logic.
The Xecure Lab Scanner (XecScan) gives the security community and general public on-demand analysis of any suspicious document file where no installation or registration is required to enjoy the service. Though it’s free, XecScan is capable of finding advanced malware, zero-day, and targeted APT attacks embedded in common file formats.
Malwr is a free malware analysis service and community launched in January 2011. One can submit files to it and receive the results of a complete dynamic analysis back.Malwr is operated by volunteer security professionals with the exclusive intent to help the community. It's not associated or influenced by any commercial or government organization of any sort.Malwr is mainly based on an open source malware analysis tool called Cuckoo Sandbox as explained in my last post at http://anupriti.blogspot.in/2015/09/cuckoo-sandboxautomatic-malware.html
In fact as you google,you will find thousands of links and websites offering free online malware analysis but one has to be careful too while submitting any file to such sites.......so happy analyzing for now.....
1. Cuckoo Sandbox is a malware analysis system tool which allows you to throw any suspicious file at it and in a matter of seconds it will provide you back some detailed results outlining what such file did when executed inside an isolated environment.It is written 100% in Python, the architecture is very interesting and it is based on a virtualisation engine like Virtual box to maintain a “fresh” pc always at hand to run the malware called the client, inside this client it is run as an agent that is also written 100% in Python to monitor the different calls that the malware do to the dll’s, host that try to connect, etc.The connection between the Server and the client is done through an isolated network set up by virtual box, it is configured that way in order to avoid the propagation of the malware and to communicate effectively between the client and the server to send the analysis report, infected binaries, etc.This post ahead brings you a step by step screenshot to download and configure this excellent tool,will be good for beginners in cyber security/penetration testing to play with and see results immediately.Though from the looks of this post below,the procedure looks cumbersome and complex,but I have made attempts for a naive to understand and follow up screenshot wise,any queries still will be most welcome :
WHAT IT DOES PRECISELY?
2. Cuckoo can produce the following types of results:
- Files being created, deleted, and downloaded by the malware during its execution
- Network traffic trace in PCAP format(as we get with wireshark and ethreal)
- Traces of win32 API calls spawned by the malware
- Memory dumps of the malware processes
- Screenshots of the Windows desktop as it happens during execution of the malware
- Full memory dumps of the machines
KINDS OF FILES FOR ANALYSIS
3. The following kinds of files can be analysed and put for check in cuckoo :
- Adequate RAM around 4 GB in all with the parent machine.
- i3 processor and above will help u lessen wait and make u patient
5. Python comes preinstalled with the Ubuntu Desktop,but we need some extra python libraries as follows :
Pydeep
Sqlalchemy
Bson
DPKT
Yara
MAEC Python bindings
Jinja2
Magic
Chardet
Pymongo
tcpdump
mongodb
Volatility
Libvirt
Bottlepy
Django
Pefile
Step 1
Firstly we will install all the above mentioned libraries vide a single command.You need to slect the below text and paste as it is in the terminal | sudo apt-get install mongodb python-sqlalchemy python-bson python-dpkt python-jinja2 python-magic python-pymongo python-gridfs python-libvirt python-bottle python-pefile python-chardet tcpdump -y
Besides above,there are other python libraries that need PIP for installation.Pip is an alternative to Easy Install for installing Python packages and is largely recommended when used in virtual environments.
Two additional software Yara and Pydeep too need to be installed and the cuckoo documentation states these need to be installed separately, however Yara is provided in the Ubuntu universe repository. but before installing Pydeep , we need to install some dependencies with the following command line to install the following :
Cuckoo requires Yara 1.7 or higher and to install yara,run the following command
sudo apt-get install yara -y
Pydeep depends on ssdeep 2.8+ and ssdeep needs to be compiled from source and likewise for Pydeep. Before doing so, a few packages are needed. The following commands will work :
| sudo apt-get install build-essential git python-dev -y | wget http://sourceforge.net/projects/ssdeep/files/ssdeep-2.12/ssdeep-2.12.tar.gz/download -O ssdeep.tar.gz | tar -xf ssdeep.tar.gz | cd ssdeep-2.12 | ./configure | make | sudo make install | ssdeep -V | 2.12(output for above)
We also need to install “git’:
sudo apt-get install git
Now cd to the directory Download, clone the pydeep project and install manually:
git clone https://github.com/kbandla/pydeep.git
cd pydeep
sudo python setup.py install
Install Yara
sudo apt-get install libtool automake
Then download yara form the git repository and install it:
Now we need to install yara-python with the following commands:
cd yara-python
sudo python setup.py install
Volatility supports memory dumps from all major 32- and 64-bit Windows versions and service packs including XP, 2003 Server, Vista, Server 2008, Server 2008 R2, Seven, 8, 8.1, Server 2012, and 2012 R2 but in recent past now on supports Linux memory dumps in raw or LiME format and include 35+ plugins for analyzing 32- and 64-bit Linux kernels from 2.6.11 - 3.16 and distributions such as Debian, Ubuntu, OpenSuSE, Fedora, CentOS, and Mandrake.VOLATILITY is to be installed next,we need the following commands:
Where user:usergroup is the user used to login to the ubuntu machine and the group is the group to which user belong
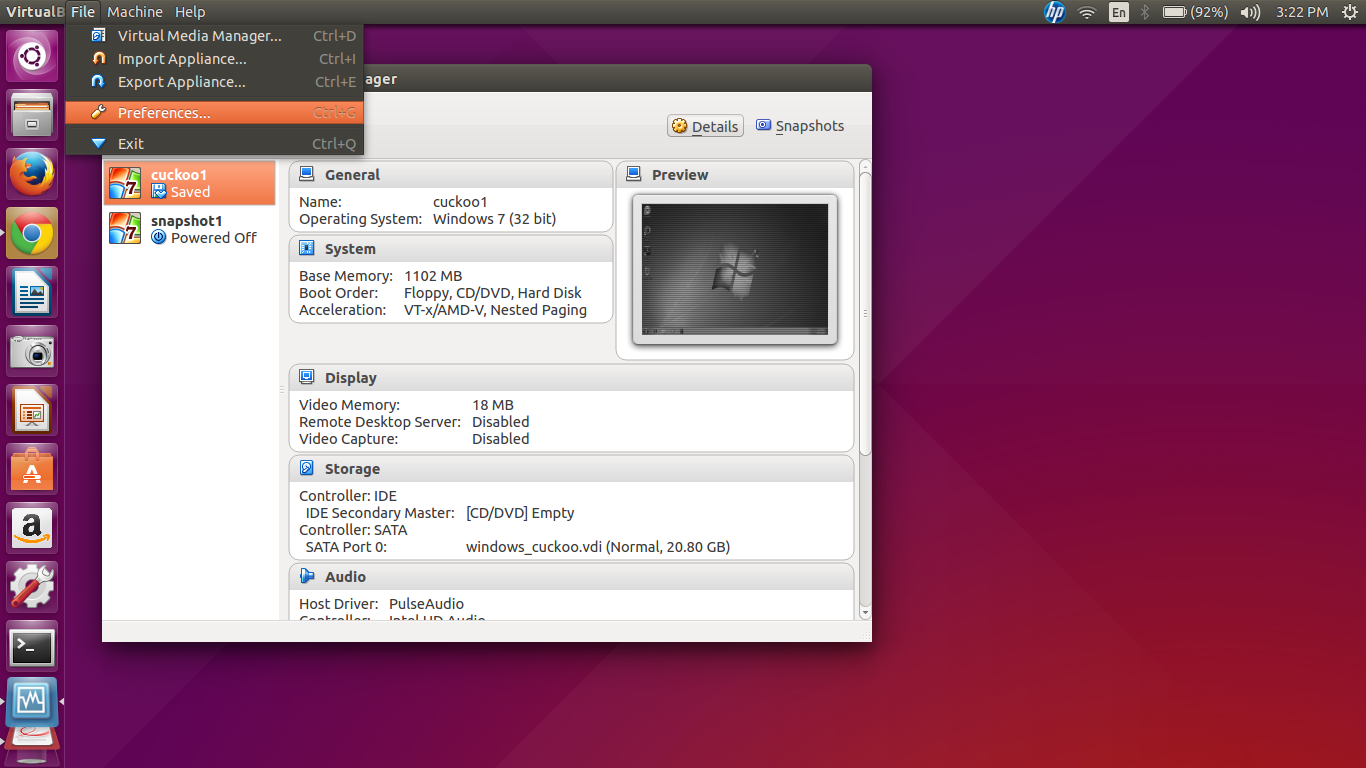
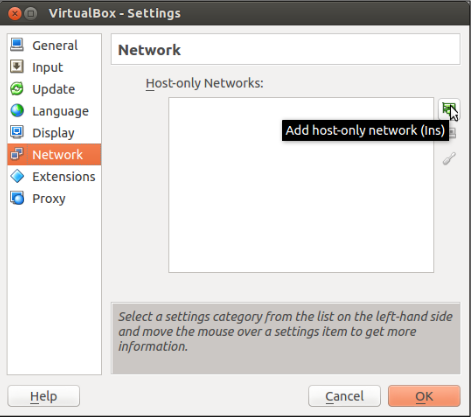
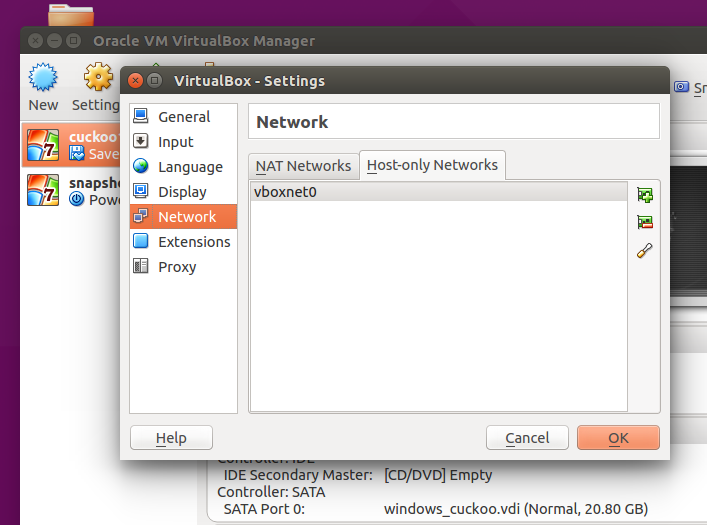
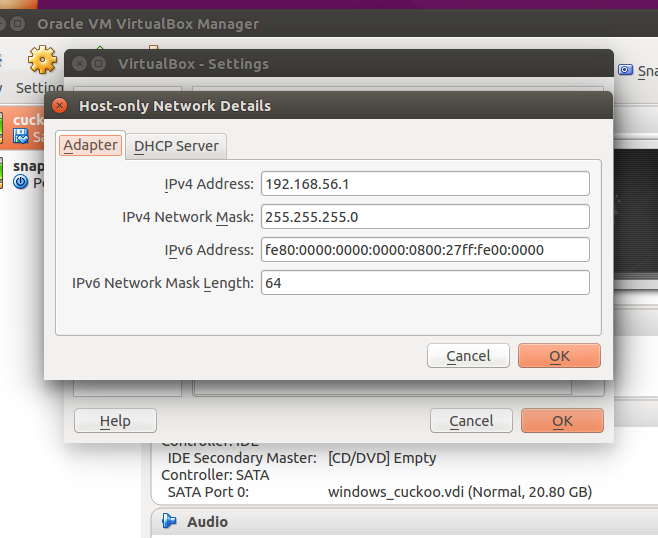
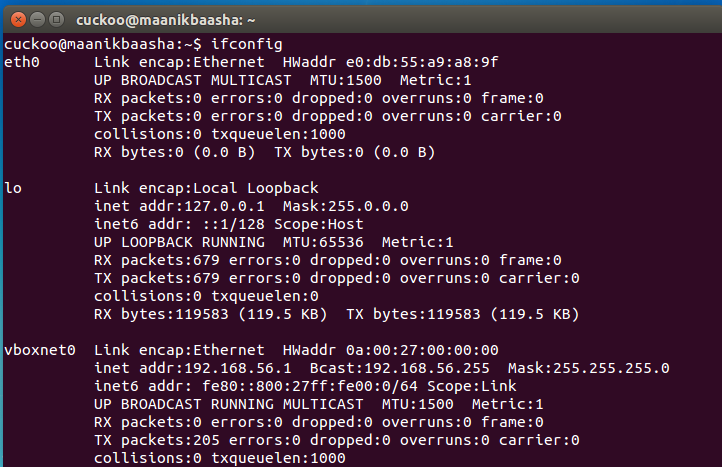
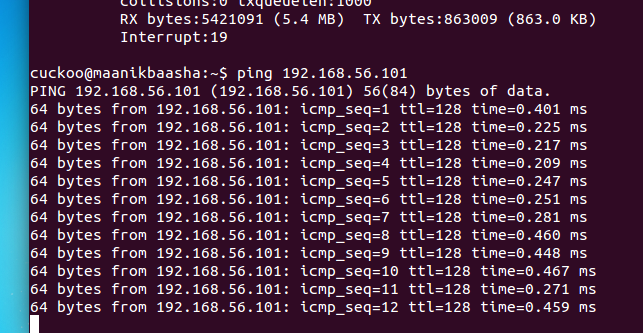
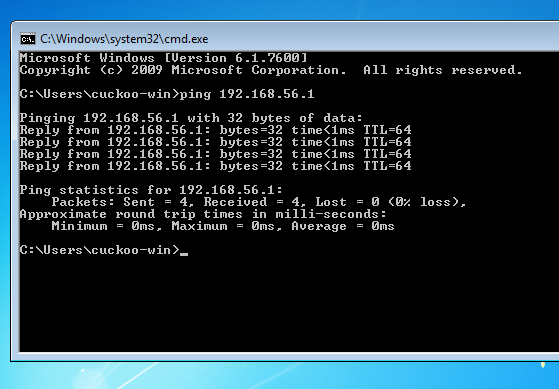
Now we shift our attention to configuring networks for Virtual Box and parent machine.So I assume you have installed Windows 7 in virtual box with Adobe,Microsoft Office and a Mozilla/Chrome browser.
Configure as shown next below :
Vide the above,the two IP addresses I have configured to ping are :
Parent/Host OS : 192.168.56.1
Virtual Windows Machine : 192.168.56.101
Just ping from each IP to other,if they ping all is set now to work ahead.
and one important step that remains is to configure the conf files in the cuckoo configuration,Few important configuration files that we effect to work with are mentioned below with brief functionality:
cuckoo.conf : This configuration file contains information about the general behavior and analysis options in Cuckoo Sandbox. machinemanager.conf : This file holds the information about your virtual machine configuration: Depends on the name of virtualization that we used. processing.conf : This file is used for enabling/configuring the processing of modules. reporting.conf : This file contains information about reporting methodologies.
There are a few things required to be changed in the configuration files as follows:
[I used gedit to edit and make amends to these conf files]
/opt/cuckoo/conf/cuckoo.conf
[cuckoo] memory_dump = on [resultserver] ip = [ip address of the vboxnet0 interface, to check it issue on terminal ifconfig vboxnet0, usually 192.168.56.1]
/opt/cuckoo/conf/virtualbox.conf
[cuckoo1] label = [Name of the Windows guest virtual machine as configured on VirtualBox] ip = [ip address configured i the windows guest] snapshot = [the name of the snapshot taken with virtual box] /opt/cuckoo/conf/memory.conf [basic] delete_memdump = yes
/opt/cuckoo/conf/processing.conf
[memory] enabled = yes [virustotal] enabled = yes key = [key of the virus total API, could be obtained registering in http://www.virustotal.com
/opt/cuckoo/conf/reporting.conf
[maec40] enabled = yes [mongodb] enabled = yes
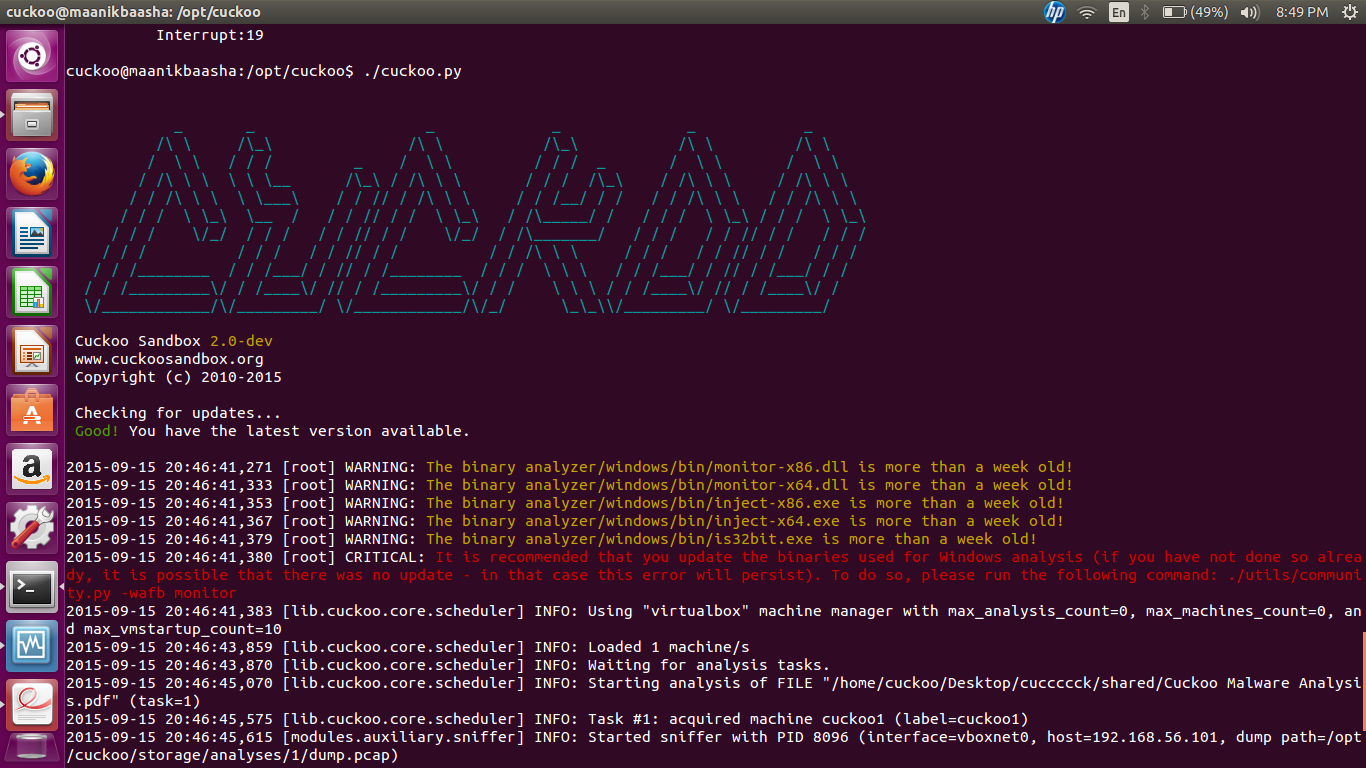
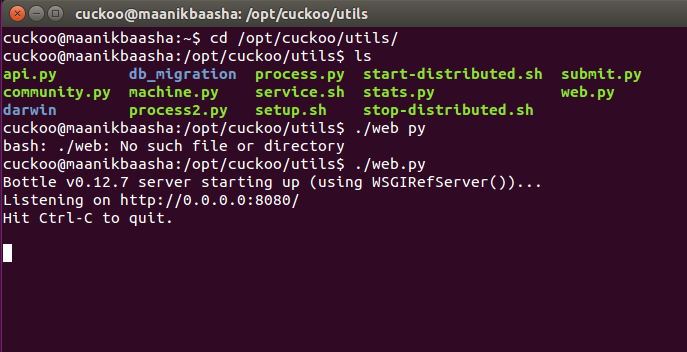
Now we can run Cuckoo after all the hardwork :
run the command as shown below and you should get the screen as below :
sudo python /opt/cuckoo/cuckoo.py
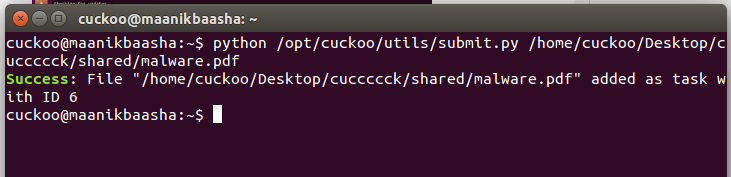
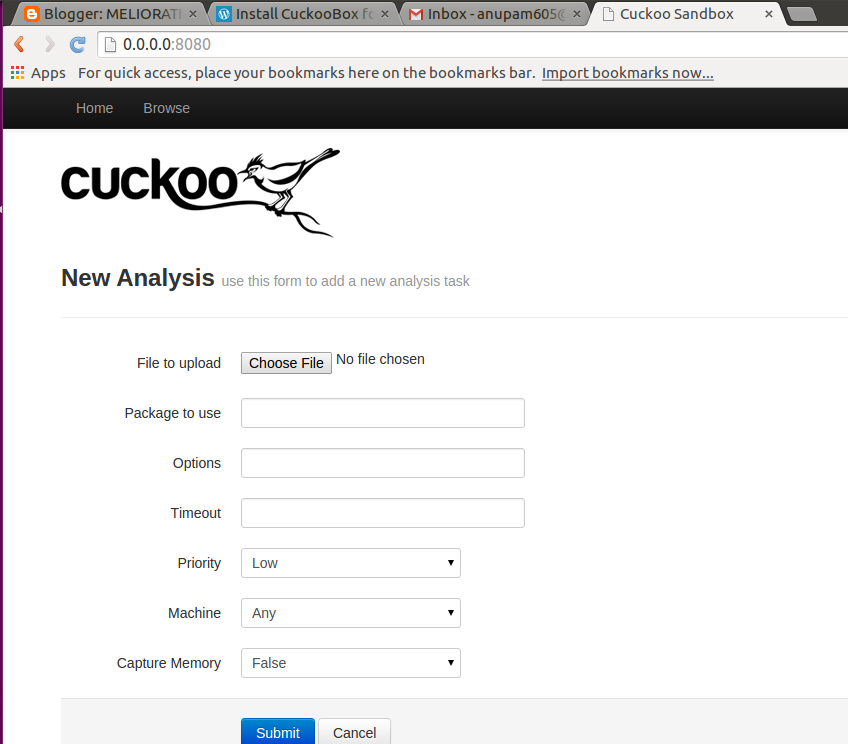
Now we need to do a submission of a file vide a script as shown below :
1. When you look at your profile on Google, you can see your total number of
views that means you can tell how many times your content has been seen
by other people, including your blog posts and profile page.When you look at someone else’s profile or page, you can also see
their total number of views.
2. Just crossed a Million plus views on my page.....incl blog...thought to share.Not a big deal though viz a viz established techno blogs who have hits in billions....
1. WhatsApp,the exceedingly renowned application that has actually swung around the way we all chat, talk, share and do so many things has so many PROs but over this small period of time since its inception it has also been the quarry of cyber criminals. With a user base as strong as 900 million active users in Apr 2015,any vulnerability in the architecture cosmos is destined to be a remunerative lure for any cyber criminal. A recent vulnerability in the form of simply sharing a vCard with other user discovered by Check Point security researcher Kasif Dekel has come to the fore. It involves simply sharing the seemingly guileless vCard with the victim and as the victim clicks the vCard, his task his over since rest will be done in the background by the malicious code terra incognita to the user. This vCard actually exists as an executable file and gets into action the moment it gets clicked by the user in the application.
RESOLVED by update from WhatsApp
2. WhatsApp affirmed and recognized the security egress and have released the fix in all versions greater than 0.1.4481 and blockaded that especial lineament.
How it Happens?
3. To activate the code, Kasif Dekel ascertained an attacker could just inject the command to the name attribute of the vCard file, separated by the ‘&’ character. When executed, it will attempt to run all lines in the files, including controlled injection line. Once such a contact is made, all an attacker has to do is share it via the normal WhatsApp client.
What made the application Vulnerable?
4. WhatsApp Web allows users to view any type of media or attachment that can be sent or viewed by the mobile platform/application. This includes images, videos, audio files, locations and contact cards.Thus the default action runs for the vCard for running the code whilst being understood as sharing the contact details.
What can it do ?
Once the code is activated,it is bound to take complete control over the target machine and will definitely monitor
the user’s activities and use the target machine to spread malicious malwares and viruses ahead.
Timelines by CHECKPOINT on the vulnerability
August 21, 2015 – Vulnerability disclosed to the WhatsApp security team.
August 23, 2015 – First response received.
August 27, 2015 – WhatsApp rolls out fixed web clients (v0.1.4481)
September 8, 2015 – Public disclosure
 https://orcid.org/0000-0002-9097-2246