Social Icons

Wednesday, April 29, 2020

Reset Ubuntu 18.04 LTS to original state

Invariably for Ubuntu users there are times when there is a need felt to get back to the original state of Ubuntu as it was at the time of fresh install.This post shares steps and screen shots to achieve the same with the help of a small tool known as RESETTER.


- After download,just double click the file which is most likely downloaded in the Downloads folder unless otherwise configured.

After double clicking it will take few minutes to install.

After installing just go to the terminal and type sudo resetter

That's all...the above steps have been shown below as screen shots..step wise

The site from where the file to be downloaded named resetter_3.0.0-stable_all.deb
 File seen in the downloads folder
 Double click the same and we get the software install notification window
 Installing after punching password as aksed

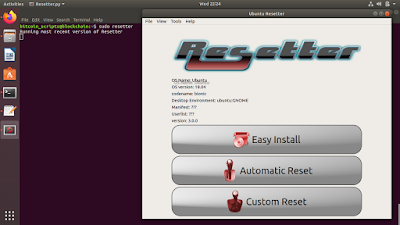
 At the terminal type sudo resetter
 There comes the resetter GUI...and u r ready to go
 Thanks

Sunday, March 01, 2020

Install "golang-github-gorilla-mux-dev" package :Ubuntu 18.04 LTS

Single line command at terminal

sudo apt-get install -y golang-github-gorilla-mux-dev


Install "golang-github-joho-godotenv-dev" package: Ubuntu 18.04 LTS

Single line command

sudo apt-get install -y golang-github-joho-godotenv-dev


Installing GO in Ubuntu 18.04 LTS

M sharing here only the terminal commands for installing GO in Ubuntu 18.04...followed by checking whether it is working or not....

Commands as follows in yellow :


Download the recent tar...herein it is go1.14.linux-amd64.tar.gz

Further to this untar the same...and move the files to /usr/bin

sudo tar -xvf go1.14.linux-amd64.tar.gz
sudo mv go /usr/local
cd /usr/local/
sudo chown -R root:root ./go

Using gedit or any other vi/vim editor, open the ~/.profile file and append the following lines at the bottom :

export GOPATH=$HOME/go
export PATH=$PATH:/usr/local/go/bin:$GOPATH/bin

Save and load the commands vide the following command

source ~/.profile

Now create a new directory

mkdir GOLA

Within this create /src/welcome and within that directory copy and paste the contents of the file below

mkdir -p GOLA/src/welcome && cd GOLA/src/welcome
touch welcome.go
gedit welcome.go 

add the following lines here in this file

package main
import "fmt"
func main() {
    fmt.Printf("welcome to go world\n")
}
 

and save above followed by build and running the file

go build

./welcome
message should be displayed welcome to the go world

Saturday, February 29, 2020

CAPT Bhopal Conference Presentation : BLOCKCHAIN-BITCOIN-CRIMES INTRODUCTION & What's it all about?

A copy of the presentation and talk that I gave at Central Academy for Police Training(CAPT) at Bhopal on 29 Feb 2020.The presentation covers a brief overview of what blockchain and bitcoin mean,how they work concluded by the crimes happening around them.


Few pics from the conference below


Tuesday, February 25, 2020

FILECOIN INSTALLATION UBUNTU : IPFS based Decentralized Storage Network

For those of you hearing this term "FILECOIN" for the first time,Filecoin is a decentralized storage network that turns cloud storage into an algorithmic market. Miners earn the native protocol token by providing data storage and/or retrieval. Conversely, clients pay miners to store or distribute data and to retrieve it. “Filecoin” can refer to  the network or a protocol or even the token powering the network, and the project.

The following execution of the commands will see you through the installation part. Few screen shots given for reference :

Run
sudo apt update
sudo apt install mesa-opencl-icd ocl-icd-opencl-dev

Build
sudo add-apt-repository ppa:longsleep/golang-backports
sudo apt update
sudo apt install golang-go gcc git bzr jq pkg-config mesa-opencl-icd ocl-icd-opencl-dev

Clone
git clone https://github.com/filecoin-project/lotus.git
cd lotus/

Install
make clean && make all
sudo make install 


Monday, February 03, 2020

Installating Ganache-CLI : Ubuntu 18.04 LTS

Few screen shots below for reference and terminal commands produced for installing GANACHE-CLI.First we need to install npm ....

    1  sudo apt-get update
    2  sudo apt install npm
    3  sudo npm install -g ganache-cli
    4  ganache-cli -a


 The accounts created with details of public private keys

Saturday, February 01, 2020

DOCKER INSTALLATION IN UBUNTU 16.04 LTS :

Will keep it simple to the point.....terminal commands to install docker and see it running in 6 commands as below :

curl -fsSL https://download.docker.com/linux/ubuntu/gpg | sudo apt-key add 

sudo add-apt-repository "deb [arch=amd64] https://download.docker.com/linux/ubuntu $(lsb_release -cs) stable"

sudo apt-get update

apt-cache policy docker-ce

sudo apt-get install -y docker-ce


sudo systemctl status docker

Thursday, January 02, 2020

Blockchain Technology Workshop : IIIT Raipur

In continuance of my earlier post here,herewith I share extract mentions of few dailies of the workshop conducted at IIIT Raipur

Click on image to enlarge

Click on image to enlarge

Click on image to enlarge

Sunday, December 08, 2019

ganache-cli : installation error Unexpected token { [SOLVED]

If you are here to resolve the following error while installing ganache-cli

/usr/local/lib/node_modules/ganache-cli/cli.js:8
var {toChecksumAddress, BN} = require("ethereumjs-util");
    ^

SyntaxError: Unexpected token {
    at exports.runInThisContext (vm.js:53:16)
    at Module._compile (module.js:374:25)
    at Object.Module._extensions..js (module.js:417:10)
    at Module.load (module.js:344:32)
    at Function.Module._load (module.js:301:12)
    at Function.Module.runMain (module.js:442:10)
    at startup (node.js:136:18)
    at node.js:966:3


The following commands will resolve this as follows :

sudo apt-get install curl python-software-properties
sudo apt-get update
sudo apt-get install curl
curl -sL https://deb.nodesource.com/setup_10.x | sudo -E bash -
sudo apt-get install -y nodejs


Node.js Installation on Ubuntu 16.04

In this post I am sharing few commands to install Node.js & npm installation on Ubuntu 16.04 LTS

sudo apt-get install nodejs
sudo apt-get install npm
nodejs -v

The last command gives the installed version as seen in the screen shot below :


Wednesday, December 04, 2019

METAHASH WALLET INSTALLATION : UBUNTU 18.04 LTS

The following blog post shares few screen shots to installation of metahash wallet.The first step needs to go to https://metahash.org/ and then click the appro download as per the OS of the user.In my case I have a Ubuntu 18.04 LTS,so I download the bin file and the rest action follows as per the screen shots below which are all self explanatory.


 this is followed by simply executing the file on the terminal with sudo rights ie sudo ./Meta*.bin


Monday, December 02, 2019

BOILERPLATE : What does this mean in the computing context?

Well,this is going to be a short post about a general info of what Boiler plates means in the computing context.Recently I came across this term for the first time as I read this paper "SHOULD CODE BE LAW? SMART CONTRACTS, BLOCKCHAIN, AND BOILERPLATE" by Jeff Lingwall and Ramya Mogallapu. Then further exploring about this term simply refers to sections of code that have to be included in many places with little or no alteration. It is often used when referring to languages that are considered verbose, i.e. the programmer must write a lot of code to do minimal jobs.

More simply  : Any routine contract document would invariably be similar for most of its part except for the names and date changes.This similar part is the Boilerplate meaning it’s the same for everyone who gets that contract, with only a few changes.

EMBARK BLOCKCHAIN FRAMEWORK : INSTALLATION Ubuntu 18.04 LTS

Embark is a framework that allows you to easily develop and deploy Decentralized Applications (DApps).A Decentralized Application is a serverless html5 application that uses one or more decentralized technologies.Embark currently integrates with EVM blockchains (Ethereum), Decentralized Storages (IPFS), and Decentralized communication platforms (Whisper and Orbit). Swarm is supported for deployment.This post gives the screen shots for installing a demo contract on EMBARK platform.Embark needs few per-requisites and tools installed including Node,Geth and IPFS.The complete list of history command as executed for getting EMBARK running is produced below :


1 sudo apt-get update
2 sudo apt-get install npm
3 sudo npm -g install embark
4 sudo npm i nyc
5 sudo apt-get install software-properties-common
6 sudo npm install
7 sudo npm -g install embark
8 curl -sL https://deb.nodesource.com/setup_10.x | sudo -E bash -
9 sudo apt install nodejs
10 curl -o- https://raw.githubusercontent.com/creationix/nvm/v0.34.0/install.sh | bash
11 nvm install node
12 nvm install --lts
13 nvm install 8.10.0
14 nvm use v10.19.0
15 nvm install v10.19.0
16 npm install -g embark
17 embark -version
18 embark demo
19 cd embark_demo/
20 embark run


Powered By Blogger