Social Icons

Showing posts with label installation. Show all posts

Sunday, June 18, 2017

Broadcom Wireless Drivers Installation : Ubuntu[SOLVED]

While one installs a fresh Ubuntu OS in any machine,typically he finds an initial deterrent as the Wifi adapter is not found  installed.This post gives a step by step direction on how and what to do,to get the Wifi working....and this happens since the same is not installed by default.

Since the PCI.ID initials for any Wifi broadcom adapter is prefixed 14e4,thus first we need to find the exact PCI.ID

Type 
lspci -nn -d 14e4:
  
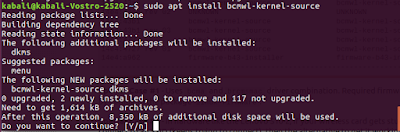
Once you get the PCI.ID,you just need to ref the following table and find the corresponding driver to be installed.In our case is 14e4:4365 rev 01,so we choos the corresponding
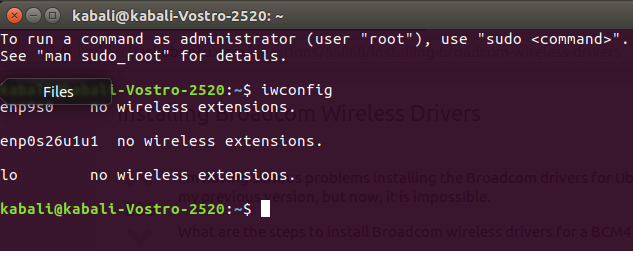
 bcmwl-kernel-source
PCI.ID              14.04 LTS                        16.04+
------------------------------------------------------------------------------------
14e4:0576           Special Case #1                   UNKNOWN      
14e4:4301           firmware-b43-installer            firmware-b43-installer      
14e4:4306           firmware-b43-installer            firmware-b43-installer      
14e4:4306 rev 02    firmware-b43-installer            firmware-b43-installer      
14e4:4306 rev 03    firmware-b43-installer            firmware-b43-installer      
14e4:4307           firmware-b43-installer            firmware-b43-installer      
14e4:4311           firmware-b43-installer            firmware-b43-installer      
14e4:4311 rev 01    firmware-b43-installer            firmware-b43-installer      
14e4:4312           firmware-b43-installer            firmware-b43-installer      
14e4:4313           firmware-b43-installer            firmware-b43-installer               
14e4:4315           firmware-b43-installer            firmware-b43-installer      
14e4:4315 rev 01    firmware-b43-installer            firmware-b43-installer
14e4:4318           firmware-b43-installer            firmware-b43-installer                
14e4:4318 rev 02    firmware-b43-installer            firmware-b43-installer                
14e4:4319           firmware-b43-installer            firmware-b43-installer               
14e4:4320 rev 02    firmware-b43-installer            firmware-b43-installer               
14e4:4320 rev 03    firmware-b43-installer            firmware-b43-installer            
14e4:4321           firmware-b43-installer            firmware-b43-installer  
14e4:4324           firmware-b43-installer            firmware-b43-installer        
14e4:4325           firmware-b43-installer            firmware-b43-installer      
14e4:4328           firmware-b43-installer            firmware-b43-installer         
14e4:4329           bcmwl-kernel-source               bcmwl-kernel-source        
14e4:432a           bcmwl-kernel-source               bcmwl-kernel-source        
14e4:432b           bcmwl-kernel-source               bcmwl-kernel-source        
14e4:432c           bcmwl-kernel-source               bcmwl-kernel-source        
14e4:432d           bcmwl-kernel-source               bcmwl-kernel-source       
14e4:4331           firmware-b43-installer            firmware-b43-installer          
14e4:4335           firmware-b43-installer            firmware-b43-installer      
14e4:4350           firmware-b43-installer            firmware-b43-installer  
14e4:4353           Special Case #1                   UNKNOWN        
14e4:4353 rev 01    Special Case #1                   UNKNOWN                 
14e4:4357           Special Case #1                   UNKNOWN        
14e4:4358           bcmwl-kernel-source               bcmwl-kernel-source
14e4:4359           bcmwl-kernel-source               bcmwl-kernel-source       
14e4:4360           bcmwl-kernel-source               bcmwl-kernel-source    
14e4:4365           bcmwl-kernel-source               bcmwl-kernel-source      
14e4:4365 rev 01    bcmwl-kernel-source               bcmwl-kernel-source      
14e4:43a0           bcmwl-kernel-source               bcmwl-kernel-source
14e4:43ae rev 02    UNKNOWN                           UNKNOWN     
14e4:43b1           bcmwl-kernel-source               bcmwl-kernel-source        
14e4:43b1 rev 03    bcmwl-kernel-source               bcmwl-kernel-source              
14e4:4727           bcmwl-kernel-source               bcmwl-kernel-source        
14e4:4727 rev 01    bcmwl-kernel-source               bcmwl-kernel-source        
14e4:a962           firmware-b43-installer            firmware-b43-installer
Thats all folks...ready to go

Sunday, September 04, 2016

Nextcloud 10 installation @ Ubuntu 16.04 LTS

1.   Nextcloud is open source file sync and share software for everyone from individuals operating the free Nextcloud Server in the privacy of their own home, to large enterprises and service providers supported by the Nextcloud Enterprise Subscription. Nextcloud provides a safe, secure, and compliant file synchronization and sharing solution on servers that you control.

2.   This post shares screen shots of my installation of the same in UBUNTU 16.04 LTS.The screen-shots are self explanatory along with the command sets available for direct lift if one is interested.

Reference help of this post : https://www.facebook.com/expertresearcher
Video post of this at https://www.youtube.com/watch?v=nXr_muYB6xI

Here's my ip address configuration as set on the virtual machine Ubuntu.
Terminal commands :

> apt-get update
 
 > apt-get install lamp-server^


> apt-get install libapache2-mod-php7.0 php7.0-mbstring php7.0-curl php7.0-zip php7.0-gd php7.0-mysql php7.0-mcrypt
> apt-get install php-xml
Goto the nextcloud site at https://nextcloud.com/install/ and download the zip file for nextcloud installation.This one is version 10

Downloading here as seen completing :
Goto the Downloads folder and unzip it
> unzip nextcloud-10.0.0.zip

> mv nextcloud /var/www/html
> chown -R www-data:www-data /var/www/html/nextcloud

Now we need to Configure MariaDB for this vide these commands as mentioned :
> mysql_secure_installation
Type Yes for all except may be root password which u might want to retain.

CREATE DATABASE nextcloud;
GRANT ALL PRIVILEGES ON nextcloud.* TO 'nextcloud'@'localhost' IDENTIFIED BY 'anupam';
FLUSH PRIVILEGES;
exit;


> Gedit /etc/mysql/my.cnf

Add the following three lines at the end:
log-bin = /var/log/mysql/mariadb-bin
log-bin-index = /var/log/mysql/mariadb-bin.index
binlog_format = mixed


Now we need to Configure Apache Web Server
> sudo a2enmod rewrite
> touch /etc/apache2/sites-available/nextcloud.conf
> ln -s /etc/apache2/sites-available/nextcloud.conf /etc/apache2/sites-enabled/nextcloud.conf
> nano /etc/apache2/sites-available/nextcloud.conf


Add the following:

ServerAdmin admin@ubuntu
DocumentRoot "/var/www/html/nextcloud/"
ServerName youripaddress
ServerAlias ubuntu

Options FollowSymLinks
AllowOverride All
Order allow,deny
allow from all

ErrorLog /var/log/apache2/your-domain.com-error_log
CustomLog /var/log/apache2/your-domain.com-access_log common

here you ready to go....just type the ipaddress in the web browser...

Thursday, July 07, 2016

Network Security Toolkit (NST)

The Network Security Toolkit is the brainchild of Paul Blankenbaker and Ron Henderson and is a Linux distribution that includes a vast collection of best-of-breed open source network security applications useful to the network security professional. The Network Security Toolkit (NST) is a Linux-based Live DVD/USB Flash Drive that provides a set of open source computer security and networking tools to perform routine security and networking diagnostic and monitoring tasks. The distribution can be used as a network security analysis, validation and monitoring tool on servers hosting virtual machines. The majority of tools published in the article "Top 125 security tools" by Insecure.org are available in the toolkit. NST has package management capabilities similar to Fedora and maintains its own repository of additional packages.he new version of NST was released June 5 and according to the NST Web site, this release includes:
 
  • A Enterprise class patch management system for NST WUI updates and system file patches and updates.
     
  • A new nstvmware script to facilitate the use of NST within a VMware virtual machine.
     
  • The inclusion of the VMware Tools and modules to optimize the NST performance within a VMware virtual machine.
     
  • Many new enhancements to the NST WUI database management pages for both the MySQL and PostgreSQL database servers.
     
  • Replaced the NST WUI network protocol anaylzer capture engine: “tethereal” with the new light-weight “dumpcap” application which is part of the new “ethereal” v0.99.0 protocol analyzer suite.
     
  • Many networking and security applications have been updated to their latest version.
Download Link :  https://sourceforge.net/projects/nst/files/latest/download?source=files

Size : 2.8 GB

The screen shots below show a run through while I installed the NST on a virtual box.


AS it completes the installation part below :
While you run the installed image for the first time,the interface will ask to create a basic user as below : 


Ready to go.....

Wednesday, June 01, 2016

Qubes OS Installation in VMWARE Workstation player

1.   Qubes OS is a security-focused desktop operating system that aims to provide security through isolation.Virtualization is performed by Xen, and user environments can be based on Fedora, Debian, Whonix, and Microsoft Windows, among other operating systems.In my earlier post here at http://anupriti.blogspot.in/2016/05/qubes-os-installation-issue-with.html,wherein I had shown the installation issue I faced in Virtual Box,here I put forth (a pretty longish installation though about 2 hours plus) a series of steps along with screenshots as I was able to install the Qubes OS in VMWARE Workstation player.


The only irritant thing is the installation time...it takes about 150 minutes to complete the entire installation.Rest any queries are welcome....
Powered By Blogger