 https://orcid.org/0000-0002-9097-2246


Plagiarism is a growing concern for writers, researchers, and publishers. It not only harms the original authors but also undermines the credibility of academic and research institutions. One way to prevent plagiarism is by using text watermarking.
Text watermarking is a technique used to embed a unique identifier in the text of a document. This identifier can be used to identify the source of the document and to determine if the document has been tampered with or plagiarized. In this blog post, we'll explore how text watermarking can be used to avoid LLM derived text from plagiarism.
LLM (Latent Language Model) derived text is a technique used by some plagiarism detection tools to compare texts based on their linguistic features. However, this method can produce false positives and may result in innocent authors being accused of plagiarism. Text watermarking can be used to address this issue by providing a verifiable proof of ownership of the text.
Here are some steps that you can follow to avoid LLM derived text from plagiarism using text watermarking:
Step 1: Create a unique identifier for your text. This can be a sequence of characters or a digital signature that is generated using a hashing algorithm.
When we talk about creating a unique identifier for your text, we are essentially talking about generating a piece of information that is specific to the document or text you want to watermark. This identifier should be unique, unambiguous, and difficult to guess. The purpose of creating a unique identifier is to provide a way to verify the authenticity of the text and ensure that it has not been tampered with or plagiarized.
There are several ways to create a unique identifier for your text. One common method is to use a hashing algorithm to generate a digital signature for the document. A hash function takes input data, such as the text of a document, and produces a fixed-size output, which is the digital signature. The output generated by the hash function is unique to the input data, so any changes to the input data will result in a different output.
Another method to create a unique identifier for your text is to use a sequence of characters. You can create a unique sequence of characters by combining elements such as your name, the date of creation, or any other relevant information. For example, you can create a unique identifier by combining your initials with the date of creation in the following format: AB-2022-04-06.
It is important to ensure that the unique identifier you create is not easily guessable or replicated. Using a common sequence of characters or numbers could make it easier for someone to guess or create the same identifier, which defeats the purpose of having a unique identifier in the first place. Therefore, it is recommended that you use a combination of elements that are unique to your text or document.
Creating a unique identifier for your text is an important step in text watermarking. It provides a way to verify the authenticity of the text and protect it from plagiarism. You can create a unique identifier using a hashing algorithm or by combining relevant information to generate a unique sequence of characters. Whichever method you choose, it is important to ensure that the identifier you create is unique, unambiguous, and difficult to guess.
Step 2: Embed the identifier in the text using text watermarking software. There are several text watermarking tools available online that you can use for this purpose.
Once you have created a unique identifier for your text, the next step is to embed it in the text using text watermarking software. There are several text watermarking tools available online that you can use for this purpose. Here's a step-by-step guide to embedding the identifier in your text using text watermarking software:
1: Choose a text watermarking tool
There are many text watermarking tools available online, both free and paid. Some popular options include Digimarc, Visible Watermark, and uMark. Research and compare various tools to find the one that best suits your needs.
2: Install and open the text watermarking software
Once you have chosen a text watermarking tool, download and install it on your computer. Then, open the software.
3: Load the text you want to watermark
Next, load the text you want to watermark into the software. This can be done by selecting "Open" or "Import" from the file menu and selecting the text file.
4: Enter the unique identifier
Now, enter the unique identifier that you created earlier into the text watermarking software. The software should have an option to enter text, which is where you can input the identifier.
5: Choose the watermarking method
The text watermarking software will have different methods for embedding the identifier into the text. You can choose from options such as visible or invisible watermarks. Visible watermarks are typically added on top of the text, while invisible watermarks are embedded within the text itself.
6: Apply the watermark
After choosing the watermarking method, apply the watermark to the text. The software should have an option to apply the watermark, which will embed the identifier into the text.
7: Save the watermarked text
Finally, save the watermarked text as a new file. Be sure to keep the original text file and the watermarked text file in separate locations.
Step 3: Register the identifier with a trusted third-party service. This will provide a verifiable proof of ownership of the text.
Registering the identifier with a trusted third-party service is an important step in protecting your text and providing a verifiable proof of ownership. Here's a step-by-step guide on how to register the identifier with a trusted third-party service:
1: Choose a trusted third-party service
There are many third-party services available online that offer text registration and verification services. Some popular options include Copyright Office, Myows, and Safe Creative. Research and compare various services to find the one that best suits your needs.
2: Create an account
Once you have chosen a third-party service, create an account on their website. This will typically involve providing your name, email address, and other contact information.
3: Upload the watermarked text
After creating an account, you will be able to upload the watermarked text to the third-party service. This may involve filling out a form or simply uploading the file.
4: Enter the identifier
When registering the text with the third-party service, you will be prompted to enter the unique identifier that you created earlier. This will allow the service to verify your ownership of the text.
5: Pay the registration fee
Many third-party services charge a fee for text registration and verification. Make sure you understand the fee structure and pay the appropriate fee to complete the registration process.
6: Verify the registration
After registering the text, you will receive a verification of the registration from the third-party service. This will typically include a unique identifier for the registered text, as well as information on the registration date and time.
7: Keep a copy of the registration certificate
Make sure to keep a copy of the registration certificate in a secure location. This will serve as proof of ownership and can be used to defend your copyright in case of infringement.
Step 4: Monitor your text for plagiarism using a plagiarism detection tool. If your text is plagiarized, you can use the identifier to prove that you are the original author of the text.
Monitoring your text for plagiarism is an important step in protecting your intellectual property and ensuring that your work is not being used without your permission. Here's a step-by-step guide on how to monitor your text for plagiarism using a plagiarism detection tool:
1: Choose a plagiarism detection tool
There are many plagiarism detection tools available online, both free and paid. Some popular options include Turnitin, Grammarly, and Copyscape. Research and compare various tools to find the one that best suits your needs.
2: Sign up for an account
Once you have chosen a plagiarism detection tool, sign up for an account on their website. This will typically involve providing your name, email address, and other contact information.
3: Upload your text
After creating an account, you will be able to upload your text to the plagiarism detection tool. This may involve copying and pasting the text, or uploading a file.
4: Run the plagiarism check
Once the text is uploaded, run a plagiarism check using the tool's software. This may take several minutes or longer, depending on the length of the text and the complexity of the analysis.
5: Review the results
After the plagiarism check is complete, review the results provided by the tool. This will typically include a report on any instances of plagiarism found in the text, as well as information on the source of the plagiarism.
6: Take action
If plagiarism is detected in your text, take appropriate action to address the issue. This may involve contacting the person or organization responsible for the plagiarism, filing a DMCA takedown notice, or taking legal action.
7: Repeat the process regularly
To ensure ongoing protection of your text, repeat the process of monitoring for plagiarism regularly. This may involve setting up automated checks or manually checking your text periodically.
In addition to text watermarking, there are other ways to avoid plagiarism, such as citing sources properly, paraphrasing, and using plagiarism detection software. However, text watermarking is a powerful tool that can provide an additional layer of protection against plagiarism.
In conclusion, text watermarking is an effective way to avoid LLM derived text from plagiarism. By following the steps outlined in this blog post, you can ensure that your text is protected from plagiarism and that you have a verifiable proof of ownership. Remember, plagiarism is a serious offense that can have long-lasting consequences, so it's important to take all necessary precautions to prevent it.
Friday, April 07, 2023
How to Avoid LLM Derived Text from Plagiarism using Text Watermarking?
How to Install IPFS via Kubo on Ubuntu ?
In this blog post, I'll be sharing a step-by-step video tutorial that will guide you through the process of installing IPFS on an Ubuntu platform using Kubo. But first, let's take a brief look at what IPFS is and why you might want to use it.
IPFS is a distributed file system that aims to replace HTTP as the primary protocol for transferring data on the internet. It allows users to store and share files with others without relying on a central server, making it more secure and efficient than traditional file-sharing methods.
Now, let's dive into the installation process. To follow along with the tutorial, you'll need to have access to an Ubuntu platform and have Kubo installed. If you don't have Kubo installed, you can find the instructions for installing it here.
Step 1: Open a terminal window on your Ubuntu platform.
Step 2: Clone the IPFS repository by running the following command:
git clone https://github.com/ipfs/ipfs.git
Step 3: Navigate to the IPFS directory by running the following command:
cd ipfs
Step 4: Install IPFS via Kubo by running the following command:
kubectl apply -f ./deployment/ipfs-kubo.yml
And that's it! IPFS should now be installed on your Ubuntu platform via Kubo.
If you'd like to see the installation process in action, check out the video tutorial below which shows IPFS installation vide another way
In conclusion, IPFS is a powerful tool that can revolutionize the way we share and store files online. By following these simple steps, you can easily install IPFS via Kubo on your Ubuntu platform and start exploring all that this innovative technology has to offer.
We hope you found this tutorial helpful. If you have any questions or feedback, feel free to leave a comment below. Happy installing!
Monday, March 06, 2023
List of chip foundries and related companies in India, along with their location and manufacturing capability
1. Semiconductor Complex Limited (SCL) - Mohali, Punjab - 180 nm, 90 nm, and 65 nm
2. Hindustan Semiconductor Manufacturing Corporation (HSMC) - Prantij, Gujarat - 14 nm
3. Sahasra Semiconductor - Bangalore, Karnataka - 180 nm to 22 nm
4. Bharat Electronics Limited (BEL) - Bangalore, Karnataka - 180 nm to 65 nm
5. Centum Electronics Limited - Bangalore, Karnataka - 180 nm to 90 nm
6. MosChip Semiconductor Technology - Hyderabad, Telangana - 180 nm to 22 nm
7. Analogics Tech India Ltd - Hyderabad, Telangana - 180 nm to 22 nm
8. Sankalp Semiconductor Pvt. Ltd. - Hubli, Karnataka - 180 nm to 22 nm
9. Ineda Systems - Hyderabad, Telangana - 28 nm
10. Vayavya Labs - Bangalore, Karnataka - 180 nm to 28 nm
11. TowerJazz Panasonic Semiconductor India (TPSI) - Noida, Uttar Pradesh - 180 nm to 45 nm
12. STMicroelectronics India - Greater Noida, Uttar Pradesh - 130 nm to 45 nm
13. Intel India - Bangalore, Karnataka - 10 nm to 45 nm
14. GlobalFoundries India - Bangalore, Karnataka - 14 nm to 45 nm
15. Texas Instruments India - Bangalore, Karnataka - 180 nm to 45 nm
It's worth noting that these manufacturing capabilities are approximate and can vary depending on the specific processes and technologies used by each company. Additionally, some of these companies may have capabilities beyond the ranges listed above, but these are the approximate ranges based on publicly available information.[CHATGPT Derived]
What nm chips are usually required in domestic appliances like refrigerators, TV and washing machine etc
Typically, these types of appliances use chips that are manufactured using older process technologies, such as 90nm, 65nm, or 45nm. These larger process technologies allow for the production of simpler and less power-hungry chips, which are sufficient for the relatively low computational demands of these appliances.
For example, a modern refrigerator might use a chip manufactured using a 90nm or 65nm process technology, which would be capable of running the basic control functions and sensors required for the fridge's operation.
Similarly, a TV or washing machine might use chips manufactured using a 45nm process technology or older, which would be capable of running the device's basic functions, such as power management, audio and video processing, and other control functions.
Refrigerators: 90nm or 65nm
TVs: 45nm or 65nm
Washing machines: 45nm or 65nm
Smartphones: 5nm to 14nm
Laptops: 5nm to 14nm
Gaming consoles: 7nm to 14nm
Wi-Fi routers: 40nm to 90nm
Digital cameras: 65nm to 90nm
Home theater systems: 45nm to 65nm
Fitness trackers: 28nm to 40nm
Dishwashers: 45nm to 65nm
Speakers: 65nm to 90nm
Earphones: 40nm to 65nm
Cars and vehicles: 28nm to 40nm (for automotive chips)
Trucks: 28nm to 40nm (for automotive chips)
Electric pumps: 65nm to 90nm
Motors: 65nm to 90nm
Generators: 45nm to 65nm
Tablets: 5nm to 10nm
Kindle book readers: 40nm to 90nm
Digital clocks: 65nm to 90nm
Smart watches: 28nm to 40nm
Keyboards: 65nm to 90nm
Mouse: 65nm to 90nm
Monitors: 28nm to 40nm
Processors: 5nm to 14nm
Graphic cards: 7nm to 16nm
Digital display boards: 28nm to 40nm
Microphones: 65nm to 90nm
CCTV cameras: 28nm to 40nm
Web cameras: 28nm to 40nm
LED tube lights: 65nm to 90nm
LED bulbs: 65nm to 90nm
Smart bulbs: 40nm to 65nm
HOW MUCH WATER IS USED IN MANUFACTURING A CHIP?
The amount of water used in manufacturing a chip can vary depending on several factors, including the size of the chip, the production process, and the location of the manufacturing facility.
However, chip manufacturing is a highly water-intensive process, and it can take thousands of gallons of water to produce a single chip. Estimates suggest that producing a single 8-inch semiconductor wafer can require up to 2,000 gallons of ultra-pure water.
The water used in chip manufacturing is primarily used for cooling and cleaning purposes, and it must be of the highest purity to avoid contaminating the chips. Water is used to clean the wafers and equipment, remove debris and contaminants, and cool the equipment during manufacturing.
To conserve water, semiconductor manufacturers typically use advanced water recycling and treatment systems that capture and treat wastewater for reuse in the manufacturing process.
In some cases, manufacturers may also use alternative cooling technologies that require less water, such as air-cooled systems or closed-loop cooling systems.
Overall, while the amount of water used in chip manufacturing can vary, it is a significant consideration for manufacturers who must balance the need for water with the need for high-quality chip production.
COUNTRIES INVOLVED FOR VARIOUS PROCESSES IN CHIP MANUFACTURING
Raw Material Procurement: The raw materials used in chip manufacturing, such as silicon wafers, chemicals, and gases, are sourced from various countries, including the United States, Japan, Taiwan, and South Korea.
Fabrication: The fabrication process involves several complex processes, including photolithography, etching, deposition, and doping, among others. These processes typically take place in facilities known as "fabs," which are located in countries such as the United States, Taiwan, South Korea, Japan, and China.
Testing: The testing of chips is a critical process to ensure that they meet the required specifications. Testing facilities are located in several countries, including the United States, Taiwan, South Korea, Japan, and China.
Packaging: The packaging of chips typically takes place in facilities located in countries such as Taiwan, China, and the United States.
Distribution: The final stage of the supply chain involves the distribution of chips to end-users, which can include original equipment manufacturers (OEMs), distributors, and retailers. Distribution centers are located in various countries worldwide, including the United States, China, Taiwan, South Korea, Japan, and Europe.
Overall, chip manufacturing is a highly globalized industry that relies on the efficient coordination of multiple countries and regions throughout the supply chain.
SUPPLY CHAIN IN CHIP MANUFACTURING
The supply chain in chip manufacturing involves several stages, including raw material procurement, fabrication, testing, packaging, and distribution.
The first stage involves the procurement of raw materials, which includes silicon wafers, chemicals, and gases. These materials are sourced from various suppliers worldwide, and their quality must meet specific standards to ensure high-quality chip production.
Once the raw materials are sourced, the fabrication process begins. This involves the use of cleanroom facilities, where the silicon wafers undergo a series of complex processes to create the individual transistors that make up the chips. These processes include photolithography, etching, deposition, and doping, among others.
After fabrication, the chips undergo testing to ensure they meet the required specifications. This involves a series of tests that check the electrical performance, functionality, and reliability of the chips. Defective chips are identified and removed from the supply chain.
The next stage involves the packaging of the chips, which involves placing them into a protective casing or chip carrier. The packaged chips are then tested again to ensure they are fully functional and meet the required specifications.
Finally, the chips are distributed to the end-users, which may be original equipment manufacturers (OEMs), distributors, or retailers. The supply chain must be carefully managed to ensure that the right quantity of chips is delivered to the right location at the right time.
In summary, supply chain management in chip manufacturing involves the coordination of various processes and activities involved in the production of semiconductors, from the procurement of raw materials to the distribution of finished products. Effective supply chain management is critical to ensure high-quality chip production, timely delivery, and customer satisfaction.
Friday, March 03, 2023
My Phd Theses Titled "Blockchain enabled cyber physical Systems on distributed storage"
Shodhganga is a reservoir and a digital repository of theses and dissertations submitted to universities in India for award of PhDs
https://shodhganga.inflibnet.ac.in:8443/jspui/handle/10603/451919 my theses on Shodganga available online now...if anyone interested to see and comment or discuss

Tuesday, March 15, 2022
Sunday, March 13, 2022
Sunday, December 12, 2021
Multichain : Appending Data to Blockchain with DATA STREAMS
Multichain : How to Connect-Receive-Send to a Blockchain node?
Multichain Blockchain Platform: Brief Introduction & Installation
This video gives a minimal few minutes introduction to the Multichain blockchain platform followed by quick installation on an Ubuntu 20.04 OS terminal. This is one of the easiest platforms to play with and understand in much better way the mechanics of blockchain. Primarily CLI based, this video installs the multichain with few commands.
Why 0.1 + 0.2 = 0.30000000000000004 ?
Have you ever tried simple calculations in usual programming languages like python, ruby, rust or Java etc
0.1 + 0.2 = 0.30000000000000004 or
0.1 + 0.7 = 0.7999999999999999 or
0.2 + 0.7 = 0.8999999999999999 or 0.3 - 0.1 = 0.19999999999999998
Why do the results show something unexpected? The reason pertains to IEEE standard IEEE-754 that defines 32bit/64 bit formats for storage of numbers in computers. This presentation tries to bring out simply of where the anomaly exists and why do we get these results. Also reaffirms that the normal IEEE-754 floating point standard will not befit for usual finance and banking applications wherein few zero's can lead to undesired losses for some and unexpected gains for few.
Tuesday, September 28, 2021
Full expanded form of IOTA blockchain?
Well.... I always used to look for the expanded form of IOTA blockchain but could never get the answer. But today I got the same finally vide a chat as produced below:
" it's not an acronym, but it stands for the smallest unit possible in the greek alphabet, as with IOTA also micropayments are possible, e.g. 0.000001 cent. IOTA is engineered completely different than a traditional blockchain, but the IOTA Foundation is one of the leading orgs for DLT research globally, pioneering the DAG (directed acyclic graph) since 2016. The DAG enables parallel access to the DLT. IOTA is designing a green, secure, feeless and highly scalable DLT, without the negative "issues" of blockchain. This also makes it very suitable for data-driven scenarios like DID. Organizations also do not need to buy/hold cryptocurrency"
Thanks Holger Kother...
Saturday, September 11, 2021
RTL8761B Tobo Mini USB Bluetooth Adapter installation on UBUNTU 20.04
No intro...no discussion....no details....will come direct to the problem and then the solution. :-)
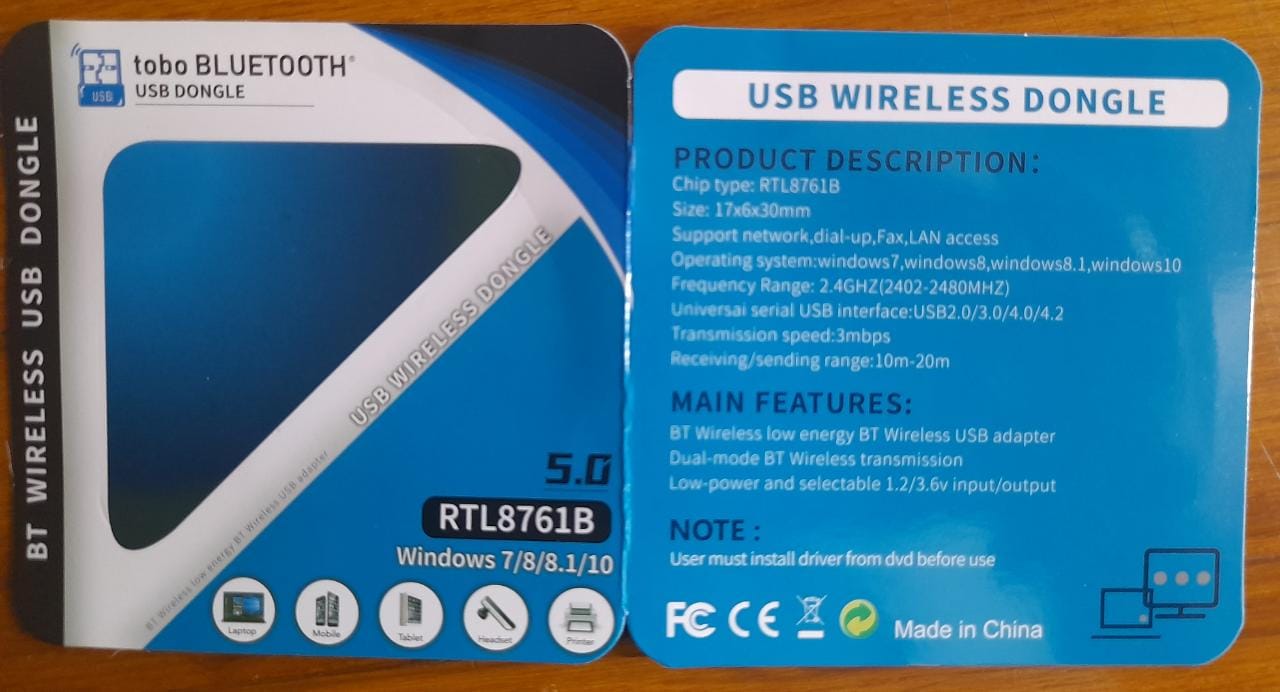
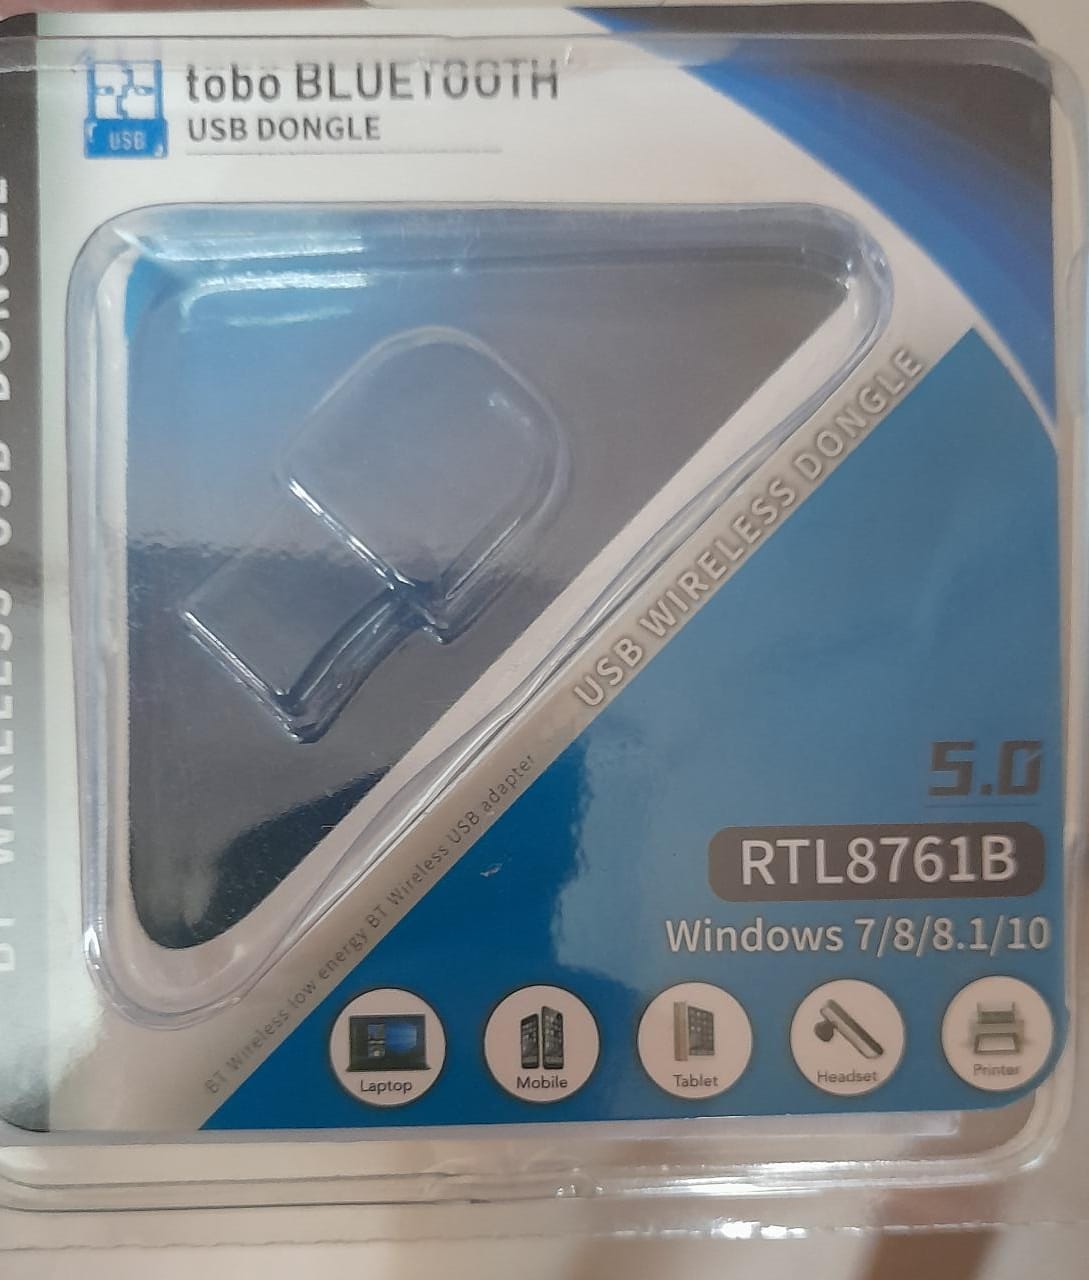
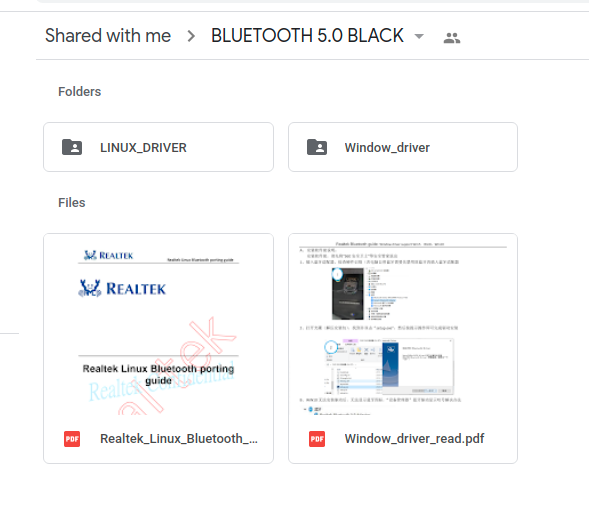
QUERY / PROBLEM: You planning to buy a Bluetooth adapter for your Linux Operating system and are pondering to buy the right one to avoid any driver or installation issues later. Since window OS users have default drivers but not so with most of devices for Linux. So since I recently bought one Tobo Mini USB Bluetooth 5.0 Adapter Wireless Bluetooth Dongle Receiver, I had to search for solutions for smooth installation. So just few lines of code to be run on the terminal and you will be good to go...the drivers for the same are available at the link https://drive.google.com/drive/folders/1-6NI2-PMbX1wmVb1FYbXblaPvZGdKElD
Once you access this folder you will find the files as seen in pic below:
Download the Linux folder and you will see some thing like below pic
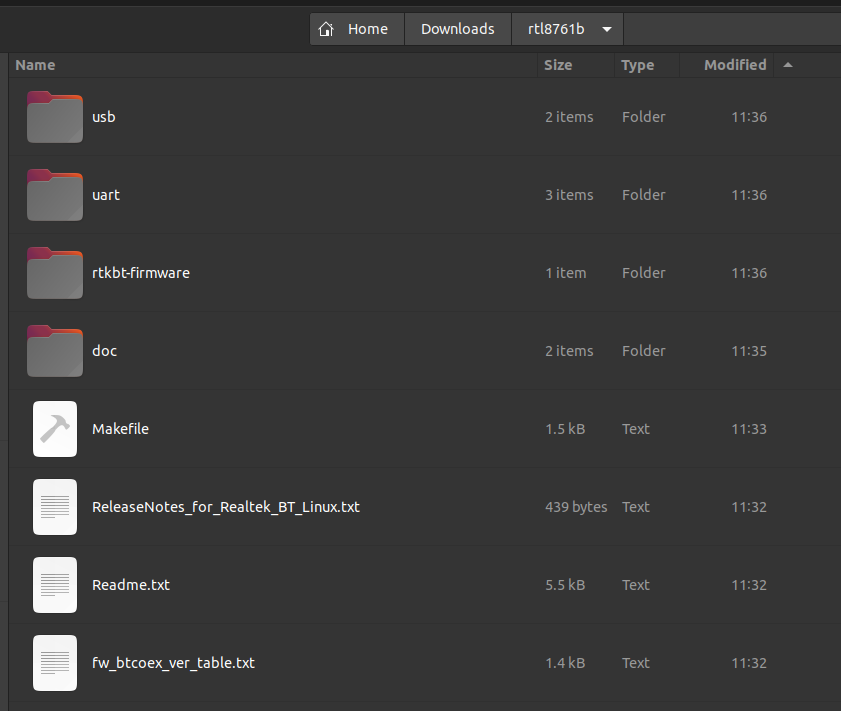
now goto the terminal inside the usb directory and run this command
sudo make install INTERFACE=all
after this command ,next move to the /home/ur_username/Downloads/rtl8761b/rtkbt-firmware/lib/firmware and run these two commands
sudo cp rtl8761bu_fw /lib/firmware/
sudo cp rtl8761bu_config /lib/firmware/
and that's all...init 6 and checkout...bluetooth will be seen...best wishes.
Tuesday, August 03, 2021
Byzantine General - Proof of Work consensus and Mining in Bitcoin Blockchain
Analogical to a Byzantine general scenario wherein a number of armies intending to attack an enemy fort need to reach a consensus of day/time to attack, this video explains how Bitcoin nodes attain consensus vide the Proof-of-work method on the same lines. This video builds up from brief history from David Chaum and Adam Bach works onwards to Wei Dai works on Blind signatures, Hash Cash and Proof-of-Work to understand concept of nonce and consensus mechanism in a Bitcoin Blockchain. Further this video brings out the reward mechanics in the Bitcoin eco-system and also Mining methods and types
Monday, August 02, 2021
Hashes & Merkle Trees in Blockchain Mechanics
Hash Functions take input of any length and produce a fixed-length string which means that one can use hashes on something as small as a few characters or as large as an entire document or even files of huge sizes in GBs and above.
On the other hand enabled by these hash functions, Merkle tree represent hash-based data structure that is a generalization of the hash list and represent structure in which each leaf node is a hash of a block of data, and each non-leaf node is a hash of its children. Both Hash functions and Merkle Trees are cardinal to the mechanics of any Blockchain.
This video focuses on a simple explanation of understanding Hashes and Merkle Trees. Hash functions SHA-256 and RIPEMD-160 have been discussed in little detail being peculiar to Bitcoin blockchain.
Thursday, July 29, 2021
Distributed Ledger Technology in BLOCKCHAIN - Simple explanation
This video post brings out what DLT i.e. Distributed ledger technology is all about and what is it's contribution to blockchain.
Technology amalgamations inside Blockchain
Blockchain is an amalgamation of multiple technologies which have existed already in the IT ecosystem for last few decades. These include majorly cryptography, private-public keys, hashes, proof-of-work and other important technologies. This video post only identifies by name of what major technologies any blockchain is enabled on.
Where to start the "Learning BLOCKCHAIN" journey ?
Related to my earlier post https://anupriti.blogspot.com/2021/05/i-want-to-learn-blockchain-but-where-do.html this post focuses on the same presentation in a video talk version....
Wednesday, July 28, 2021
Recent Advances and Trends in Lightweight Cryptography for IoT Security and Blockchain Technologies at RGPV Bhopal 27th July 2021
An FDP was held peculiar to domain of Lightweight Cryptography for IoT Security and Blockchain Technologies at RGPV Bhopal on 27th July 2021.The objective of this FDP was to bring together faculties, researchers, PG and UG students from across the country to learn about security challenges in Modern Cryptography, Blockchain & IoT. FDP aimed to demonstrate security challenges that Modern Cryptography, Blockchain, IoT systems pose, demands users to select a reliable and compatible architecture according to the business requirements to ensure secure flow of data and communication and also define the solution and future prospects related to these challenges. I gave a small 2 hour talk on the same which is available at the youtube link below
CLICK ON THE IMAGE BELOW TO BE REDIRECTED TO THE YOUTUBE LINK

WHAT BLOCKCHAIN SIMPLY MEANS : A Short attempt
National E-Conference on Regulation of Crypto-currency in India - 24 July 2021 at NLIU Bhopal


I was part of the valedictory session of this conference, invited as a chief guest in the evening concluding session. More details of the same available at https://www.barandbench.com/apprentice-lawyer/first-national-e-conference-on-regulation-of-cryptocurrency-in-india-by-rgnclc-nliu-bhopal
Monday, July 05, 2021
Cryptocurrency Technology Foundations and Crimes Investigations
To fight against the rising challenges of Cyber Crimes, the Gurugram Police in association with Society for Safe Gurgaon, Indo-Israeli cyber security enterprise and SafeHouse Technologies organised the 9th edition of Gurugram Police Internship (GPCSSI 2021) under the mentorship of ACP Cyber crime Karan Goel and the entire Gurugram police cyber crime team in coordination with Rakshit Tandon Advisor Cyber Peace foundation. This presentation talk on cryptocurrency technology and crimes investigation was taken by Anupam Tiwari on 05th July 2021. Sharing for info of interested in domain.
Tuesday, June 08, 2021
MERGING PDF: UBUNTU 20.04 LTS
This small post shares a one line command in Ubuntu terminal to merge to PDFs. While for the regulars,merging the same online would seem to be the quickest and the best but there are times when you wish your PDFs are not compromised by third party websites offering these mergers for free...so why not use a one line command with the help of a tool pdftk.
The command to install the same is
sudo apt-get install pdftk
and the command thereafter to merger the PDFs like three files 1.pdf, 2.pdf and 3.pdf is as seen below:
pdftk 1.pdf 2.pdf 3.pdf cat output 4.pdf
where 4.pdf is the merged final output file.
That's all...no third party website reliance for private files.
Monday, May 03, 2021
TALLINN MANUAL & GLOBAL ATTEMPTS IN CYBER WARFARE POLICIES
The presentation is one unique presentation peculiar to TALLINN MANUAL version 1.0 and 2.0. Along with is discussed cyber policy attempts of other countries.The Tallinn Manual has long been the flagship research initiative of the NATO CCDCOE. The original Tallinn Manual (published in 2013 by Cambridge University Press) addressed the most severe cyber operations followed by version 2.0. The presentation cover the origin details of why this manual arrived at the global scene and what followed around at the global attempts for framing the global cyber policy.
Saturday, May 01, 2021
I want to learn Blockchain, but where do I start from? : Here is My Answer.
I am writing this one exclusive post for guys who just wish to begin their journey in the domain of Blockchain. "Blockchain" term has been buzzing across academia, universities, corporate industries and every where around. In most of the webinars I speak in, I find many inquisitive learners willing to jump in the domain but unable to find that exclusive blockchain sea where to dive in. And if ever they try diving in, the sheer amount of books, videos and sea of information existing on the internet just splashes their visions soon to drown. Herewith I am sharing few slides that are based on my journey in this domain for now over 5 years. The presentation brings out details of topics one should start exploring and dig in followed by few books that I have in person followed and imbibed from.
Wednesday, April 28, 2021
Technology Internals behind Blockchain Technology
I have erstwhile shared and uploaded a number of presentations on Blockchain technology and crypto crimes though. This presentation solely focuses on internals of blockchain technology and has additional details starting from scratch for newbies to develop an initial understanding of this awesome technology. Anyone with any clarifications on any slide may contact back at the email mentioned at end of the presentation. Also sharing a picture of my books peculiar to my blockchain exploring interest

Technology Internals behind Blockchain Technology by Anupam Tiwari on Scribd
Tuesday, April 27, 2021
Blockchain Forensics & Cryptocurrencies : NFSU FDP 09 April 2021
The School of Cyber Security and Digital Forensics, National Forensic Sciences University, Gandhinagar organised a 5 day online Faculty Development Program (FDP) on 'Advanced Trends in Digital Forensics' from 05 Apr-09 Apr 2021.The aim of this FDP was to promote research and strengthen the Digital Forensic Investigation Techniques which include topics like crime investigation, latest trends in Digital Forensics, Fake News Detection, and Drone & Crypto Forensics. I was a invited speaker here and am sharing my presentation deck here on blockchain and cryptocurrency forensics.


Cryptocurrency Forensics and Blockchain Technology by Anupam Tiwari on Scribd
Saturday, February 06, 2021
BRAVE Web Browser : How much advertisements I blocked in a week ?
Hello friends, herewith first I am sharing screen shots of my brave browser dashboard that I captured over a week from 30 Jan 2021 to 6 Feb 2021.The screen shots I have taken pertain to morning hours whenever I login for the day. I am generally on my PC for about 8-9 hours a day. I majorly watch YouTube videos and surf across multiple sites in a day that range from 50-100 at times. So what I am bringing out here that how many ads Brave browser has blocked in this duration and whilst this surfing times.
30 Jan 2021 : 70517 blocked : Counter 0

31 Jan 2021 : 77744 blocked : Counter 7227 in day( i.e. 30 Jan 2021)

01 Feb 2021 : 92342 blocked : Counter 14598 in day( i.e. 31 Jan 2021)

02 Feb 2021 : 97440 blocked : Counter 5098 in day( i.e. 01 Feb 2021)

03 Feb 2021 : 105386 blocked : Counter 7946 in day( i.e. 02 Feb 2021)

04 Feb 2021 : 108354 blocked : Counter 2968 in day( i.e. 03 Feb 2021)

05 Feb 2021 : 112036 blocked : Counter 3682 in day( i.e. 04 Feb 2021)

06 Feb 2021 : 114870 blocked : Counter 2834 in day( i.e. 05 Feb 2021)

So,total ads blocked over a week is 44353 that deduces to approx average of 6336 ads/day. That's phenomenal to say. Each of these trackers would be definitely linked to thousands of other trackers also giving them unrestricted access to all the user behavior ,privacy and profiles. While there is not much a normal user can do about these trackers, I feel just blocking these thousands of ads will not make any one absolutely free of tracking,but still better than surfing without blockers. Because if the ad companies know that users are blocking by means of plugins and such browsers,they would have already found ways to still track you. After all that's their means of living and minting economy.
Sunday, January 31, 2021
REMOVE METADATA FROM IMAGES: UBUNTU with exiftool utility
Just few commands in Ubuntu to check the meta data and thereafter remove the same.I am using a utility exiftool which does not come inbuilt to most of the Linux systems,but we need to install them.
INSTALL COMMAND
sudo apt-get install libimage-exiftool-perl
USAGE COMMAND
exiftool -all= IMG_20200504_215424.jpg
(The above command creates a separate copy of the original file and the new file which is created with removed metadata)
or
exiftool -overwrite_original -all= IMG_20200504_215424.jpg
(The above command overwrites the original file with the new file created with removed metadata)
Showing you output of one file prior to removal of meta data and thereafter removing the meta data
ORIGINAL FILE
kabali@Kabali:~/Desktop/ddd$ jhead IMG_20200504_215424.jpg
File name : IMG_20200504_215424.jpg
File size : 3588382 bytes
File date : 2021:01:31 14:10:13
Camera make : Xiaomi
Camera model : Mi A2
Date/Time : 2020:05:04 21:54:24
Resolution : 4000 x 3000
Orientation : rotate 90
Flash used : No
Focal length : 4.1mm (35mm equivalent: 4mm)
Exposure time: 0.050 s (1/20)
Aperture : f/1.8
ISO equiv. : 1000
Whitebalance : Auto
Metering Mode: center weight
GPS Latitude : ? ?
GPS Longitude: ? ?
JPEG Quality : 98
REMOVED METADATA FILE
kabali@Kabali:~/Desktop/ddd$ jhead IMG_20200504_215424.jpg
File name : IMG_20200504_215424.jpg
File size : 3556853 bytes
File date : 2021:01:31 14:30:08
Resolution : 4000 x 3000
JPEG Quality : 98
Friday, January 29, 2021
REMOVING META DATA FROM VIDEO FILES : UBUNTU TERMINAL COMMANDS
Hello everyone, this post focuses on removing metadata from a video file using ffmpeg inbuilt utility in Ubuntu OS. The following command includes the original file MAH08207.mp4 being stripped of metadata and being output into a new file as output.mp4.
ffmpeg -i MAH08207.mp4 -map 0 -map_metadata -1 -c copy output.mp4
The output of the command is as below:
ffmpeg version 4.2.4-1ubuntu0.1 Copyright (c) 2000-2020 the FFmpeg developers
built with gcc 9 (Ubuntu 9.3.0-10ubuntu2)
configuration: --prefix=/usr --extra-version=1ubuntu0.1 --toolchain=hardened --libdir=/usr/lib/x86_64-linux-gnu --incdir=/usr/include/x86_64-linux-gnu --arch=amd64 --enable-gpl --disable-stripping --enable-avresample --disable-filter=resample --enable-avisynth --enable-gnutls --enable-ladspa --enable-libaom --enable-libass --enable-libbluray --enable-libbs2b --enable-libcaca --enable-libcdio --enable-libcodec2 --enable-libflite --enable-libfontconfig --enable-libfreetype --enable-libfribidi --enable-libgme --enable-libgsm --enable-libjack --enable-libmp3lame --enable-libmysofa --enable-libopenjpeg --enable-libopenmpt --enable-libopus --enable-libpulse --enable-librsvg --enable-librubberband --enable-libshine --enable-libsnappy --enable-libsoxr --enable-libspeex --enable-libssh --enable-libtheora --enable-libtwolame --enable-libvidstab --enable-libvorbis --enable-libvpx --enable-libwavpack --enable-libwebp --enable-libx265 --enable-libxml2 --enable-libxvid --enable-libzmq --enable-libzvbi --enable-lv2 --enable-omx --enable-openal --enable-opencl --enable-opengl --enable-sdl2 --enable-libdc1394 --enable-libdrm --enable-libiec61883 --enable-nvenc --enable-chromaprint --enable-frei0r --enable-libx264 --enable-shared
libavutil 56. 31.100 / 56. 31.100
libavcodec 58. 54.100 / 58. 54.100
libavformat 58. 29.100 / 58. 29.100
libavdevice 58. 8.100 / 58. 8.100
libavfilter 7. 57.100 / 7. 57.100
libavresample 4. 0. 0 / 4. 0. 0
libswscale 5. 5.100 / 5. 5.100
libswresample 3. 5.100 / 3. 5.100
libpostproc 55. 5.100 / 55. 5.100
Input #0, mov,mp4,m4a,3gp,3g2,mj2, from 'MAH08207.mp4':
Metadata:
major_brand : MSNV
minor_version : 22675568
compatible_brands: MSNVmp42isom
creation_time : 2020-11-09T00:48:18.000000Z
Duration: 00:00:44.16, start: 0.000000, bitrate: 12146 kb/s
Stream #0:0(und): Video: h264 (Main) (avc1 / 0x31637661), yuv420p(tv, bt709/bt709/iec61966-2-4), 1440x1080 [SAR 4:3 DAR 16:9], 12016 kb/s, 25 fps, 25 tbr, 25k tbn, 50 tbc (default)
Metadata:
creation_time : 2020-11-09T00:48:18.000000Z
handler_name : Video Media Handler
encoder : AVC Coding
Stream #0:1(und): Audio: aac (LC) (mp4a / 0x6134706D), 48000 Hz, stereo, fltp, 127 kb/s (default)
Metadata:
creation_time : 2020-11-09T00:48:18.000000Z
handler_name : Sound Media Handler
Output #0, mp4, to 'output.mp4':
Metadata:
encoder : Lavf58.29.100
Stream #0:0: Video: h264 (Main) (avc1 / 0x31637661), yuv420p(tv, bt709/bt709/iec61966-2-4), 1440x1080 [SAR 4:3 DAR 16:9], q=2-31, 12016 kb/s, 25 fps, 25 tbr, 25k tbn, 25k tbc (default)
Stream #0:1: Audio: aac (LC) (mp4a / 0x6134706D), 48000 Hz, stereo, fltp, 127 kb/s (default)
Stream mapping:
Stream #0:0 -> #0:0 (copy)
Stream #0:1 -> #0:1 (copy)
Press [q] to stop, [?] for help
frame= 1104 fps=0.0 q=-1.0 Lsize= 65489kB time=00:00:44.13 bitrate=12154.5kbits/s speed= 540x
video:64774kB audio:688kB subtitle:0kB other streams:0kB global headers:0kB muxing overhead: 0.039428%
The size of the original file and the stripped of file is
-rw-r--r-- 1 kabali kabali 67050400 Nov 9 06:19 MAH08207.mp4
-rw-rw-r-- 1 kabali kabali 67060450 Jan 29 20:23 output.mp4
Thus difference between the files is the meta data removed.
I am also showing the output of ffprobe utility run on the two files to show you the difference of meta data removed too.
ffprobe MAH08207.mp4
ffprobe version 4.2.4-1ubuntu0.1 Copyright (c) 2007-2020 the FFmpeg developers
built with gcc 9 (Ubuntu 9.3.0-10ubuntu2)
configuration: --prefix=/usr --extra-version=1ubuntu0.1 --toolchain=hardened --libdir=/usr/lib/x86_64-linux-gnu --incdir=/usr/include/x86_64-linux-gnu --arch=amd64 --enable-gpl --disable-stripping --enable-avresample --disable-filter=resample --enable-avisynth --enable-gnutls --enable-ladspa --enable-libaom --enable-libass --enable-libbluray --enable-libbs2b --enable-libcaca --enable-libcdio --enable-libcodec2 --enable-libflite --enable-libfontconfig --enable-libfreetype --enable-libfribidi --enable-libgme --enable-libgsm --enable-libjack --enable-libmp3lame --enable-libmysofa --enable-libopenjpeg --enable-libopenmpt --enable-libopus --enable-libpulse --enable-librsvg --enable-librubberband --enable-libshine --enable-libsnappy --enable-libsoxr --enable-libspeex --enable-libssh --enable-libtheora --enable-libtwolame --enable-libvidstab --enable-libvorbis --enable-libvpx --enable-libwavpack --enable-libwebp --enable-libx265 --enable-libxml2 --enable-libxvid --enable-libzmq --enable-libzvbi --enable-lv2 --enable-omx --enable-openal --enable-opencl --enable-opengl --enable-sdl2 --enable-libdc1394 --enable-libdrm --enable-libiec61883 --enable-nvenc --enable-chromaprint --enable-frei0r --enable-libx264 --enable-shared
libavutil 56. 31.100 / 56. 31.100
libavcodec 58. 54.100 / 58. 54.100
libavformat 58. 29.100 / 58. 29.100
libavdevice 58. 8.100 / 58. 8.100
libavfilter 7. 57.100 / 7. 57.100
libavresample 4. 0. 0 / 4. 0. 0
libswscale 5. 5.100 / 5. 5.100
libswresample 3. 5.100 / 3. 5.100
libpostproc 55. 5.100 / 55. 5.100
Input #0, mov,mp4,m4a,3gp,3g2,mj2, from 'MAH08207.mp4':
Metadata:
major_brand : MSNV
minor_version : 22675568
compatible_brands: MSNVmp42isom
creation_time : 2020-11-09T00:48:18.000000Z
Duration: 00:00:44.16, start: 0.000000, bitrate: 12146 kb/s
Stream #0:0(und): Video: h264 (Main) (avc1 / 0x31637661), yuv420p(tv, bt709/bt709/iec61966-2-4), 1440x1080 [SAR 4:3 DAR 16:9], 12016 kb/s, 25 fps, 25 tbr, 25k tbn, 50 tbc (default)
Metadata:
creation_time : 2020-11-09T00:48:18.000000Z
handler_name : Video Media Handler
encoder : AVC Coding
Stream #0:1(und): Audio: aac (LC) (mp4a / 0x6134706D), 48000 Hz, stereo, fltp, 127 kb/s (default)
Metadata:
creation_time : 2020-11-09T00:48:18.000000Z
handler_name : Sound Media Handler
ffprobe output.mp4
ffprobe version 4.2.4-1ubuntu0.1 Copyright (c) 2007-2020 the FFmpeg developers
built with gcc 9 (Ubuntu 9.3.0-10ubuntu2)
configuration: --prefix=/usr --extra-version=1ubuntu0.1 --toolchain=hardened --libdir=/usr/lib/x86_64-linux-gnu --incdir=/usr/include/x86_64-linux-gnu --arch=amd64 --enable-gpl --disable-stripping --enable-avresample --disable-filter=resample --enable-avisynth --enable-gnutls --enable-ladspa --enable-libaom --enable-libass --enable-libbluray --enable-libbs2b --enable-libcaca --enable-libcdio --enable-libcodec2 --enable-libflite --enable-libfontconfig --enable-libfreetype --enable-libfribidi --enable-libgme --enable-libgsm --enable-libjack --enable-libmp3lame --enable-libmysofa --enable-libopenjpeg --enable-libopenmpt --enable-libopus --enable-libpulse --enable-librsvg --enable-librubberband --enable-libshine --enable-libsnappy --enable-libsoxr --enable-libspeex --enable-libssh --enable-libtheora --enable-libtwolame --enable-libvidstab --enable-libvorbis --enable-libvpx --enable-libwavpack --enable-libwebp --enable-libx265 --enable-libxml2 --enable-libxvid --enable-libzmq --enable-libzvbi --enable-lv2 --enable-omx --enable-openal --enable-opencl --enable-opengl --enable-sdl2 --enable-libdc1394 --enable-libdrm --enable-libiec61883 --enable-nvenc --enable-chromaprint --enable-frei0r --enable-libx264 --enable-shared
libavutil 56. 31.100 / 56. 31.100
libavcodec 58. 54.100 / 58. 54.100
libavformat 58. 29.100 / 58. 29.100
libavdevice 58. 8.100 / 58. 8.100
libavfilter 7. 57.100 / 7. 57.100
libavresample 4. 0. 0 / 4. 0. 0
libswscale 5. 5.100 / 5. 5.100
libswresample 3. 5.100 / 3. 5.100
libpostproc 55. 5.100 / 55. 5.100
Input #0, mov,mp4,m4a,3gp,3g2,mj2, from 'output.mp4':
Metadata:
major_brand : isom
minor_version : 512
compatible_brands: isomiso2avc1mp41
encoder : Lavf58.29.100
Duration: 00:00:44.16, start: 0.000000, bitrate: 12148 kb/s
Stream #0:0(und): Video: h264 (Main) (avc1 / 0x31637661), yuv420p(tv, bt709/bt709/iec61966-2-4), 1440x1080 [SAR 4:3 DAR 16:9], 12016 kb/s, 25 fps, 25 tbr, 25k tbn, 50 tbc (default)
Metadata:
handler_name : VideoHandler
Stream #0:1(und): Audio: aac (LC) (mp4a / 0x6134706D), 48000 Hz, stereo, fltp, 127 kb/s (default)
Metadata:
handler_name : SoundHandler
SPLIT VIDEOS IN UBUNTU: SINGLE LINE COMMAND{ffmpeg utility}
Sharing here just a single line command of ffmpeg utility which can split a video with time duration's specified.So if your video is suppose 05:03(min:sec) long and you wanna split it into two sizes with part 1 as 00:00 to 02:28 and the other part 2 as 02:28 to 05:03,the commands to be executed will be
ffmpeg -i VID_20210129_115611.mp4 -ss 00:00:00 -t 00:02:28 part1.mp4
ffmpeg -i VID_20210129_115611.mp4 -ss 00:02:28 -t 00:05:03 part2.mp4
where VID_20210129_115611.mp4 is the main file and part1.mp4/part2.mp4 are the respective output files.
Thursday, January 28, 2021
MERGE VIDEOs IN UBUNTU: TWO TERMINAL COMMANDS
Hi guys...no time waste here...I m mentioning two commands to simply merge your multiple videos quickly in an Ubuntu OS.No GUI or other applications to download or use. The ffmpeg command inbuilt to Ubuntu easily merges without hassles.
So,the first command is
find "$(pwd)" -type f -name '*.mp4' -printf "file '%p'\n" | tee mp4_compile.txt
The above command will simply find your all mp4 files in the directory wherein you run this command in the terminal directory and compile them into one text file. This text file is named here as mp4_compile.txt. You can name it any thing.
The second command is as given below:
ffmpeg -f concat -safe 0 -i mp4_compile.txt -c copy merged.mp4
This command will merge all the files compiled in the txt file and merge into one output file names as merged.mp4
Thats all...I actually went through a lot of softwares and applications...tried online merge too but all had some kind of limitation in size...till I found these commands.So happy sharing and happy merging.
NOTHING BLOCKCHAIN ABOUT IT :-)
Wednesday, January 20, 2021
Ubuntu 20.04 LTS brightness control with command line[SOLVED]
The good thing is that this utility comes pre-installed with the OS. You just need to use it vide few command line inputs and these are as below:
The first command is
xrandr | grep " connected" | cut -f1 -d " "

xrandr --output HDMI-0 --brightness 0.7
 |
SETTING RESOLUTION
xrandr --output HDMI-0--mode 1680x1050
SCREEN REFRESH RATE
xrandr --output HDMI-0--mode 1680x1050 --rate 60.00
Another switch –q will query your monitors and give details as seen below

Just remember to change your screen name as per your monitor name...in my case like I said...it is HDMI-0.
Thursday, January 14, 2021
CQ 100: Meet India’s Most Influential Cyber Warriors
First post in this year...though little delayed comes as a pleasant surprise from the cyberosphere.....Sharing here the link of a post that has identified India’s most influential cyber warriors and has listed me too....
https://www.the420.in/cq-100-meet-indias-most-influential-cyber-warriors-top-cyber-experts/
Screenshot as below:


